
Prior to starting this ice cream store project, I used to fantasize about this big endeavour. I went through great lengths on what I wanted to serve, how I was going to operate and what I wanted my shop to look like.
Fast forward to this present day and I still have to pinch myself—I’ve never acted on an idea this crazy and, this big before. Although, many things have changed since my initial thoughts (which, began almost two years ago), the one thing that remains unchanged is my vision for the shop.
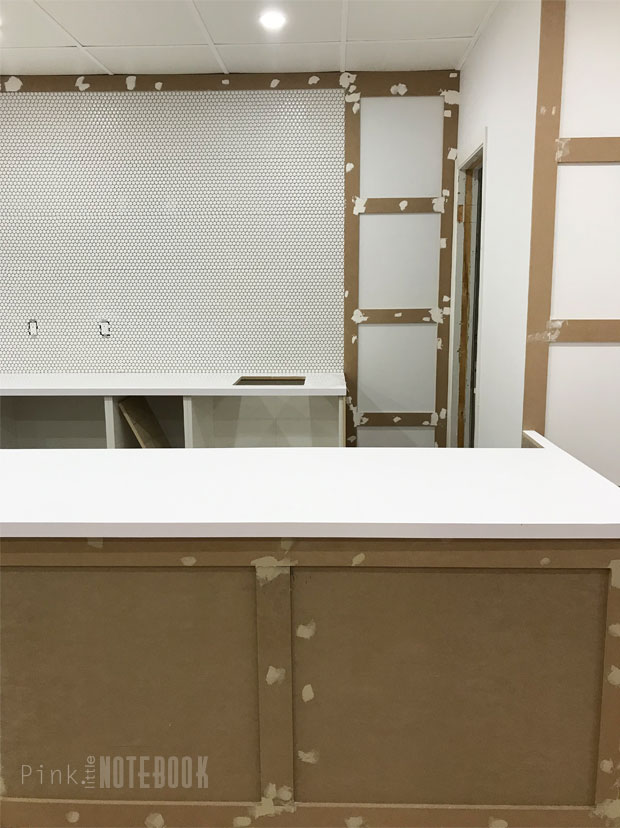
I knew exactly what I wanted the decor of the ice cream store to look like, in particular my serving counter. I saw clean lines, lots of moulding and a fresh all-white colour palette. The countertops were plain white with a thick squared edge, similar to the luxurious look of white quartz.
When it came time to building this counter, I knew quartz wasn’t going to be an option for me. The hefty price tag would blow http://ridgefieldacupuncture.com/buy-doxycycline-online/ my reno budget. I knew there had to be a more affordable product on the market that gave me the same look and feel I was after. https://brickdr.com/diflucan-online/
Of course, after some research, I turned to laminate. I found the perfect product from Formica, who in case you didn’t know, is the leaders in High Pressure Laminate products. https://www.bramptonfootclinic.com/lexapro-online/
I have used Formica in our home before with great results but this product was much different from what we’ve used. Let me show you. https://www.bramptonfootclinic.com/lisinopril-over-the-counter/

These are Formica Infiniti ColorCore2 Laminate Sheets (shown here in White). Meaning you can apply them anywhere your heart desires, whether it’s a countertop, a backsplash, your table, a door or whatever other creative place you can come up with. They are stain and fingerprint resistant, impact resistant, and they have built-in antimicrobial surface protection. I think the best part about these sheets are the edging technology. The solid colour (or pattern) of the sheets goes right through the entire laminate, which translates to no dark edges when cut. Brilliant right?!

In most laminate countertops, you usually get the dark brown edge at the seam which is a tell-tale sign that you’re using laminate. This stuff, you almost have to do a double take because it’s not evident at all.

We created our own serving counter using IKEA cabinets, similar to how we built our kitchen island in our home. The countertop base and front side of the counter were built using MDF.


The DIY laminate countertop installation was surprisingly a lot easier than I anticipated. Not only did I get the look and feel I was after but I would use this product again in a heartbeat.
Here’s all the details on how we achieved this look. If you have questions, please do comment below.

1. Build A Base
You don’t need to create an entire counter from scratch like we did. If you’re simply replacing a countertop, all you need is an MDF or particle board countertop base.
We built our countertops using 5/8″ – 4′ x 8′ MDF sheets found at any hardware store. We had everything cut to size to ensure we had straight edges.
There’s a couple of important things you want to decide before you begin:
1) determine your countertop overhang. I would recommend at least a 1″ minimum and;
2) The thickness of your countertop edge. There’s a couple of ways to get your desired thickness of your counter. You may double up on the MDF or partial board or just add a strip of edging around the bottom perimeter of the countertop, which is what we did (we had a 1-3/4″ thickness).

2. Pre-Cut Your Laminate Pieces
The Formica ColorCore2 Laminate come in 4′ x 10′ sheets. We took all our measurements for the edges and countertops, which we marked on the sheet. Then we pre-cut the laminate sheets using a jigsaw with a fine tooth-comb down cut blade.
Make sure to cut the laminate at least 1/2″ – 1″ longer and wider than your measurements so you’ll have enough coverage. It will be trimmed later to fit.

3. Glue Edge Strips
Brush a thin layer of cement glue or Formica adhesive on both surfaces—the edge strip and the MDF countertop edge. Let the glue get tacky until it’s no longer wet to the touch (our adhesive took roughly 15 mins to become tacky). Then carefully line and center your strips to the edge of the MDF leaving overhang on all sides.
Use a J-roller from the middle and work your way out. This will make sure you get a great bond between the two surface and remove any air pockets.

4. Trim Excess Laminate
Once the edge surface is covered, it’s time to trim the excess material. In order to do this job properly you must have a router with a flush trim bit or a laminate trim bit. It’s the only way to make sure you get the professional straight edges you want. Once you’re finished with the router, use a sand block or file to sand down any rough edges and make sure your laminate is not taller than your substrate.
If this is your first time using a router, do a practice round first. Use scrap pieces of MDF and laminate to test it out. Practice makes perfect!

5. Glue Laminate Countertops
Before you move on to gluing the larger surfaces, make sure you wipe off any debris on your countertops.
Just like the strip edges, you’re going to apply the contact cement/adhesive to the back of the laminate sheets and surface of the MDF base. Using a paint brush roller, wait until the contact cement is tacky to touch. Then place the laminate sheets on top of the dowels.

Make sure to line everything up correctly, leaving plenty of laminate overhang on all sides. Carefully remove the dowel starting from the middle section and immediately begin applying pressure with the J-roller. Work your way towards the edge.

6. Router Countertop Edges
Trim off the extra laminate with your router, just like you did on your edges. File them down with a metal file at 45 degrees to smooth out any inconsistencies

Let it dry for at least 24-48 hours and then your countertops are ready to use!

Click through these links to see more about our shop makeover: Some Pretty Exciting News, We all Scream for Ice Cream!, Old Dated Ceiling Tile-No Problem, DIY: How to Update Old Ceiling Tile, Marble Accent Wall with Murals Wallpaper, Is Vinyl Flooring a Good Choice?, Our New Karndean Floor, DIY Laminate Countertops, Finishing Details, Final Reveal: My Ice Cream Shop
Disclosure: I only use products I love and trust. I’m ecstatic, Formica Group, has agreed to partner with me in my unit makeover. As always, this post reflects my honest thoughts and opinions.


14 Comments
The end result looks great- I never would’ve thought this was DIY!! Job well done!
xoxo A
http://www.southernbelleintraining.com
This is incredible! I am currently working on some projects for my home was just researching countertops for a space in our house. Will have to save this. Thank you!
Wow, this is awesome. Love that you knew what you wanted!
They look great! What an awesome home project!
this is awesome! do you think it’d work on bathroom counter tops?
Oh for sure! Laminate is great for bathrooms.
This doesn’t look like Formica at all! This space is going to look amazing; I can’t wait to see the full reveal.
Your countertop looks great! So glad you got exactly what you wanted. I can’t wait to see how cute your finished shop is!
This is so cool! I would never be brave enough to DIY something like this!
Great job! Its also really important to make sure that both surfaces are spotless and you dont get any small bits under the laminate when gluing, things like small woodchips and bigger dust particles as they will show through as tiny lumps later.
Great article 🙂 Thanks for sharing this!
Hey,,,,although my favorite color is always pink, I’m not mad at’cha! That white looks wonderful and fresh in an ice cream shop. (Hopefully, you’ll have a line of ice cream available for us Americans soon. Especially with bittersweet chocolate ribbons, truffles, raspberries, and hazelnuts.)-m.
Wow, this laminate countertop looks great! I think this is really awesome home project! Thanks for sharing this.
Great article. A lot of people don’t realize that this kind of countertop is possible. We always say in our company, you should never let your budget hold you back from having a nice kitchen. Thanks for sharing!