

It’s been 10 weeks, 4 days since I started this project.
I’ve had good days. Like finding a dream tool that made painting my stair risers a breeze.
And bad days. Realizing I made a huge mistake when my paint started peeling.
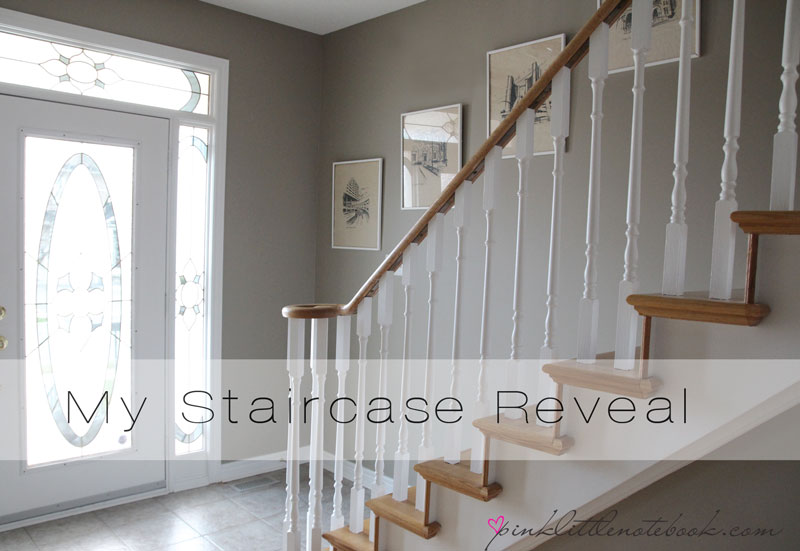
This project definitely gave me my fair share of ups and downs but thankfully, I’m D O N E!
Here is the progress I’ve made from start to finish.

Big change? I think so!
And this is what it looked like midway (view more pics here).

Now if you’re considering re-painting a staircase in your home, give yourself a pat on the back. You’re a brave sole!
Okay. Okay. I’m making it seem worst than what it really is.
In all honestly, it is a pretty straight forward process: Clean; Prep; Paint. However, just keep in mind this is not a weekend project. Depending on your staircase, you may want to designate quite a bit of time to this one.

Here are two tips that I strongly advise you to read if you decide to take the leap. Mistakes can be a great learning experience but sometimes learning from someone else’s mistakes is much better (especially in the case of number 1 below).
1) You want to determine the type of finish your staircase has been treated with before you begin to paint. Our staircase was treated with an oil finish (which I didn’t know). And yes, I painted with latex and then wanted to cry when it started peeling the next day.
In this case, you need to prep your surfaces with oil based primer. . . and then you go to town with latex paint! (Side Note: Oil paint STINKS. It was my first time using it and it has a really harsh chemical smell. If you’re planning to paint and need to use this stuff, wait until the Spring or Fall when you can open all the windows and get a breeze.)
2) I never noticed these gaps between our stair risers until it was highlighted with white paint! This probably bothered me more than the peeling paint AND more than all the time I spent painting spindles. I will admit I’m extremely anal when it comes to details. And this is one I couldn’t tear my eyes away from.

Bothered by this problem for weeks, I finally came up with a solution. I used DAP DryDex Spackling.
Boy did it work like a charm! It went on pink so I could see exactly where this product was going. It filled the gaps no problem and then dried white.
I was happy again, once I saw these results!

Now I’m getting to to the best part of this whole project?

Scoring these babies!!


Remember my first time in a thrift store when I found this side table? Well I went back to that place and nearly screamed when I came across a set of 12 framed renderings. The lady helping me thought I was completely nuts. I tried hard to tame my excitement but I failed miserably.
And what makes these renderings even better, they are all landmarks in Toronto from the 1960’s. Major score!

That’s it! Now that this paint job is over I can focus on getting some decor pieces for the front entrance. Woohoo!
Want to stay updated? Follow me on Facbook or Twitter ! !

[Check out these posts for hallway updates: DIY pendant lighting and creating a front entrance.]


48 Comments
As soon as I started reading your article today, I knew right away what had caused the peeling of the paint. When we purchased our first house in 1967, it had been previously owned by a large family and to sell the house, he had gone down to the local paint store or hardware and bought “Opps! paint colors and painted the kids bedrooms. Being young and excited about the :”new” adventure of home ownership, we bought latex paint right away..Glidden or Sherwin Williams if I remember right and the same things happened to us. My FIL told my DH that he needed to sand the old paint off and apply a primer first, then our selected color. Your home builder probably applied a sealer/varnish on the stair treads I’m guessing.
I love the way you have your art work hung going up the staircase. So beautifully executed, it carries one’s eye right up to the top of the stairwell. Do you keep a home journal of what colors, brand of paint and product# so you’ll know the next time you decided to repaint? Read somebody’s blog yesterday how they keep a record, etc. She makes her own labels and even paints the entire lid to each color.
Pat yourself on the back for patience and stamina to stick with the job till finished. I bet it’ll be a long time before you will want to change the color! I would have hired a professional because I wouldn’t have the patience to spend all that time redoing them over.
Always a pleasure to hear from you Betty!
Peeling paint is such a rookie mistake. My stomach was in knots when I realized how much time I wasted painting and how much more time I was going to waste correcting this issue. But I feel pretty positive I won’t make that mistake twice 🙂
I do keep all my paint names and numbers in case I do need to repaint, however, they are kind of all over the place. I never really thought to keep it all organized in a journal. What a great idea!
Thanks so much Betty!!
How did you fix the bubbling issue? Did you resand and then apply the oil based or did you just apply the oil over the latex?
Hi Paula, I definitely had to re-sand all the spots that started bubbling or peeling. Then I applied the oil base. If you just leave it, it will show in your finish product. Hope you find this helpful!
Way to go Sabrina! Those prints are gorgeous. And I will try all your tricks when I paint our stairs. Maybe a blog crew project! Thanks for sharing your success it looks amazing.
Thanks for the comment Meredith! It will definitely make a great blog crew project, not to mention, a huge difference in your home! Can’t wait to see what you do.
Gorgeous job! Redoing our staircase is on my To Do list. Right now it’s carpeted and unlike most Blogger stories where they rip it off and wow there’s hardwood under, we’ve got nothing. So it’s a job from scratch. Needless to say that’s why it’s still currently carpeted. Beautiful job and I love the art work!
Don’t you just love those stories?! However, I think that’s the reason why most attempt the staircase in the first place (easy fix!). I would definitely be in the same boat as you. It’s a big job to complete. Good luck, I’m sure your results will be outstanding. Thanks for the comment.
It turned out so gorgeous. I can’t imagine how much work it must’ve been, but so worth it! Love the vintage prints!
The vintage renderings are my fav find! Thanks for the comment Shauna!
It was worth it, Sabrina! It looks amazing, and now I know how to do mine 😉 Thanks for sharing.
Thanks so much Susan!!
Love the new look, great transformation! I also used my DAP Drydex sample for a project recently! That stuff is HANDY. Oh and those prints are awesome.
Loved the DAP Drydex. Such a versatile product! Thanks for the comment!
I am still so in lurve with those prints! But the stairs look pretty good too 😉
Good job!
Thanks so much Becky!!
I noticed your framed Toronto renderings right away – they look amazing, fabulous score! Oh, and the stairs look great too 😉
Its really great I would say. The end result is quite satisfactory I would say and I would like to say that good things always require effort and time and that’s what you have devoted to the project and inspired many people to go ahead with the though process you applied here.
It looks great! I’ve always wanted to do this to my stairs. Thanks for the tip re: the oil paint – wouldn’t have thought about that!
Wow what a makeover…looks very good:) What a nice blog you got!!
Wow, fantastic change!!! I have the exact same staircase except it spans for THREE FLOORS!!!! Depressing just thinking about it but will do this in the very near future! Thanks for the tips…
Natalie
I love the Toronto drawings you found!
I love the colour of your walls — I can’t seem to find the paint colour/brand on your blog? Could you *please* let me know that colour?? Thanks so much!
Thanks Vanessa! The paint colour on the wall is Benjamin Moore – Meditation
Hi! Beautiful staircase! I also have an oak staircase and would love to paint the spindles white. I am concerned about not being able to paint the bottom spindles (near the curved part of the staircase) completely due to how tight together they are. Did you have any problem with that? How did you resolve?
Hi Dawn! You are definitely right, it was a little more difficult to get too. You basically need a small hand, a small tip paint brush and lots of patience. If I had to do it all over again, I would take the time to remove all the spindles from the staircase and then paint. Hope that helps!
LOVE those prints! I’ve been meaning to paint my stairs, but can’t remove the carpet anytime soon sooooo I’ve been postponing that fun DIY 😉
You did an amazing job with the steps- way to go! Could you talk more about how you filled the gaps? Did the DAP come in a tube? Did you use tape so that the treads would be protected? Did you need to sand afterwards? Thanks so much.
Hi Chris! I used DAP DryDex Spackling which comes in a tube. See product here: http://www.dap.com/product_details.aspx?BrandID=141&SubcatID=23 My first couple of steps, I used tape to create a straight line on the tread but then I found it easier to scrap the tape and just use my finger to smooth it out. Any excess I wiped off with a clean damp rag. I did not sand afterwards, just let it dry! It was very simple and I only used it in the gaps and not on the entire stair tread. You couldn’t tell the difference between the gaps with DAP and the spots with no DAP. I hope this helps 🙂
I was just wondering if you used the Dap in the tube or the tub? Did you have to paint over it after filling in the gaps or did it just blend in? I am also painting my stair risers and also needed to fill in some gaps.
Hi Elaine!
I used DAP in the tube. I cut the applicator on a angle to make it easier to use on my stairs. Once I applied it to my gaps, I then smoothed it out with my finger. I didn’t have to paint it afterwards, it dried to the exact same white of the stair risers. However, the product is paintable if you do need to do so in your own home. Hope this helps! All the best in your project 😉
Hi what is the colour of the paint on the wall going up the staircase, it looks like a grey taupe? Its lovely and do you recommend if i have a staircase all oak to go half white like you did?
Hope to hear from you thank you
Hi Sue, the colour in the hallway is from Benjamin Moore – Meditation. I personally like adding white to oak staircases as I think it updates the look a little more, however, it’s all depends on preference!
what color white was used on stairs?
Hi Jaimie, it’s Benjamin Moore – Simply White.
I am from Toronto, Great renderings. Where did you get them?
Hi Kathy, the renderings were a lucky find at a thrift store!
I also live in Toronto….you’re not willing to share your secret gem of a thrift store?? 🙂
Thanks for your article – I was going to paint my risers black because I think it looks more funky, but now I’m torn because you’re white looks good too. The staircase to my 2nd floor apt is dark so I think I’m leaning towards white.
I just had my stairs stained and have not had time to paint yet, trying to find the right white. Sides are chantilly lace which I think is too white and walls are BM Collingwood. Simply White is quite so to speak as well. Unfortunately risers are a different type of wood and sanding did not turn out so well so must be painted or I would just leave.
Some people are painting their risers all kinds of colours or collages but I think its alot of work so would have to like it for alot of years. Saw some examples on Houzz and Pinterest.
And yes, which Thrift Store? Too bad Goid Will is gone eh?
Hey ladies, the thrift store I visit a lot is in Streetsville, Mississauga
Hi Sabrina, We’ve had to replace a few spindles thanks to our puppy. Unfortunately we couldn’t find a perfect match for stain. I’ve talked my husband into letting me paint all the spindles white. I’m just curious if you had to sand them first and should I use the oil based primer on them .
Hi Wendy, I did lightly sand the spindles prior to priming. I personally would use an oil based primer or an oil-to-latex primer (less of an odour) to be on the safe side.
Hey, I love love that grey. What is it called?
Hi Meg,
The paint colour on the wall is called Meditation by Benjamin Moore
What finish was the paint you used for the risers – flat, eggshell, gloss, etc.?
This is very inspiring. We bought a home 3 mo ago that was built in 1988 with oak bannisters. Very dated. I’ve been wanting to update them but was pretty intimidated. This was very helpful. I may replace the spindles with iron ones and stain the bannisters, and treads. I have new carpet on the stairs so I am nervous that I will mess that up. But I’m gonna try!!
Hi! Love the makeover! Do you happen to know the stain color of the stair caps?
Your staircase looks wonderful.
Thank you in advance for please sharing the stain colour that you use on the railing and treads.
Thank you