
The anticipation is over. . . it’s finally here!
For those that may not know, the PARA Blog Crew have been secretly working away to surprise you with 5 awesome paint projects in honour of Spring! You may view each crew member’s projects at the end of this post by clicking the links provided + don’t forget to join our link party!

For this spring paint challenge, I took the opportunity to perk up my front entrance. I had an itch to accessorize and brighten this small space for quite a while now. With my ‘front’ closet being no where near my ‘front’ door, I needed a storage solution that was both function yet stylish for all those front-entry necessities.

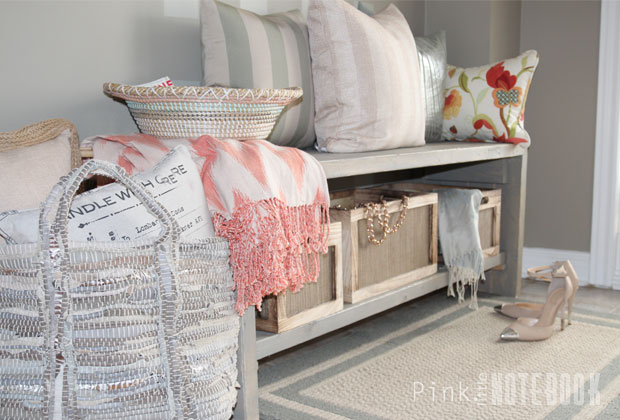
This paint project consists of two steps. My first step begins with a bench that my hubby and Big Joe built for me. Constructed out of 2×4’s and 2×6’s this bench was made to fit the nook right beside my front door.

As you know, I love the charm of worn, aged rustic furniture so it’s no surprise when it comes to painting this bench I wanted to mimic that effect. To best achieve this look, I used two different wood stains in a subdued colour palette.
(note: I’m no expert when it comes to using stains so this basically was a trial and error process for me, hence the lack of pictures during the staining process).


I started off with a semi-transparent stain in artichoke (PARA Paints, ST23) and covered the majority of the bench with two coats of this stain leaving some spots untouched.
A few hours later, I went over it with a translucent stain in natural grey (PARA Paints, RC3). I used one coat of this stain to achieve a lighter pale look.
With a rag, I wiped off the parts of the natural grey where I wanted more of the artichoke stain to show through. I continue darkening other spots and even combining the two stains to create the look of an uneven paint job. The stains were very easy to work with.
I let the bench dry overnight.

The next day I gave the bench a light sanding on all the areas that would see the most contact from touching (ie: edges, top of bench, raised areas) to further complete the worn out look. I loved how the colour turned out.
 ]
]
Step two: Create a focal point on the wall using a painted pattern
On my existing wall colour, I used painter’s tape to create a pattern of 4″x4″ boxes. After taping up my wall, I though to myself “how cool would the boxes look with an ombre effect”.
Good idea right?! Of course…. if it wasn’t a last minute decision and had I actually picked out the PARA paints colours.
Jumping the gun once again, I took matters in my own hands and grabbed left over paint cans to make my own combination of colours for this ombre effect. Big mistake. I found out the hard way—mixing your own colours just doesn’t work.
So I had to repaint all my boxes. I ended up using Spring Saige (PARA Paints, PF40, the same colour from my DIY pendant lighting). Although, it would have been a lot cooler to have an ombre wall, the Spring Saige looks just as good. It has this cool glowing effect when the sunlight hit it.

Next I accessorized. I added crates for miscellaneous stuff, a basket for keys/mail and I even added cushions for comfy sit. Needless to say my spruced up front entrance might just be my new favourite spot.


Now for the fun part! Be sure to click each of these links below to see what the PARA Blog Crew created for their spring project!


On to the Party!
We want to see what you’re up to! It’s time to link up your latest and greatest Spring projects. You have one week from today to submit your entries. I look forward to seeing all your creativity!

SPRING FEVER – Share your Spring paint projects!
A few simple rules:
- We ask that you only link projects that were created by you.
- You must link directly to a specific post.
- Do NOT link posts that are linked to your link party, shop or giveaway.
If you do, YOUR LINK WILL BE DELETED
Be sure to follow each of your PARA Blog Crew hosts:
The Dreamhouse Project
Bloglovin’ ~ Twitter ~ Pinterest ~ Facebook ~ Instagram ~ Google+
Newberry Sykes
Bloglovin’ ~ Mere Twitter ~ Sue Twitter ~ Mere Pinterest ~ Sue Pinterest ~ Facebook
Pink Little Notebook
Bloglovin’ ~ Twitter ~ Pinterest ~ Facebook ~ Instagram ~ Google+
Saige Wisdom
Bloglovin’ ~ Twitter ~ Pinterest ~ Facebook ~ Instagram
Sweet Suite 10
Bloglovin’ ~ Twitter ~ Pinterest ~ Instagram
By linking up, you are giving us permission to feature your project on our blogs,
Facebook, Pinterest, Google+ and other social media platforms.
Lastly, PLEASE VISIT & COMMENT ON OTHER LINKS!


26 Comments
Beautiful! I love the finish on the bench…it looks so well-loved. Too bad about the ombre effect….but the Spring Saige looks great and I bet it ties in nicely with the lamp too. I’m feeling the Spring Fever 🙂
Thanks so much Mere! I would have loved to do an ombre effect with pastel colours but it was such a last minute afterthought. Next time!
Wow. Prettiest entry I’ve seen in a long time! I would want to hang out there all day,
Thanks so much Susan!
Loving your new entry way. That bench looks like a great place to pause to put on shoes , etc. I’m super impressed by the accent wall – It must have taken forever to calculate and lay out the pattern, but it’s the perfect thing for that wall.
Thanks Michelle, I super excited I don’t have to sit on the floor to put my shoes on anymore! To calculate and lay the pattern out wasn’t bad at all since it was such a small area. If I had to do an entire wall. . . well that’s a different story:)
Very nice – LOVE the stain for the bench and the paint design on the wall! Really beautiful!
Thanks so much Cher!
Love love love your foyer! Great job–looks amazing!
Thanks so much Paulina!
Wow Sabrina your entry looks so cozy! I agree with Sue – if totally want to hang out there all day. The worn stain effect you achieved on the bench is perfection! As is the feature wall. I don’t know how you had the patience to tape it out but the end result is so worth it!
Thanks so much Tash! It looks like a lot of taping but it really wasn’t that bad. Believe it or not, I’ve done striping on an entire wall before and found that to be more time consuming than the boxes!
Love your fun paint and thank you for hosting a happy new link party!
Thanks Kristen & I look forward to seeing your spring project!
Wow! That looks amazing!
You did a great job!! So creative! I think the bench blended in very well!! I am looking forward to seeing more!!
Love it! I love the wall—great idea and it looks fantastic!
This is beautiful!! I’m looking forward to finally doing some painting and reorganizing this Spring/Summer.
Kris
Wow, you put me to shame. =) Beautiful ideas and pictures.
I love how your entry turned out!! I linked up two of my posts. Thanks so much for hosting. All of you girls are right up my alley!
You did a beautiful job Sabrina!! I love the bench! I’ve been thinking about DIY’ing myself one for my mudroom but haven’t found the time…. And the feature wall is such a great idea. Good on you for having the patience to do that!
This is so pretty. I love it.
That is one solid bench! I love how you’ve made it look softer and welcoming with the stain and your accessories. The wall treatment was a perfect touch! It looks almost pearlescent.
Such a pretty look! And I’m impressed with your skillz with the staining to get that worn paint look. Amazing job.
I just love the muted colours and the grid pattern. Wonderful job!