Pink Little Notebook
  • Home
  • About
  • Projects
  • Room Bf+Af
  • Contact
  • SHOP
Before + After Makeovers, DIY, Home Office, Project Gallery 25

The Chandelier Saga: DIY Before and After Pictures

By Sabrina @pinklilnotebook · On April 18, 2013

The DIY chandelier is complete and I love the profound statement it makes in my home office.  As a continuation from my previous post, here is my before and after photo.

before_after

I can’t stop staring at my new light fixture.  It turned out exactly how I imagined.  And the best part, it’s super easy to do!

Here’s what I did.
As soon as I got it home last week, I gave this thrift store chandelier a good cleaning (it took about a roll of paper towel to shined this up quite nicely). Then I hauled this thing over to my garage to start the painting.

Cleaned_chandelier

I taped the open end of the electrical wires and I stuffed newspaper in the light sockets to make sure the paint wouldn’t damage the connection.  Then I went to town with some white spray paint.

spray_painted

Make sure you use one of these holders.  It makes spray painting a breeze!

spraypaint

white_spraypaint

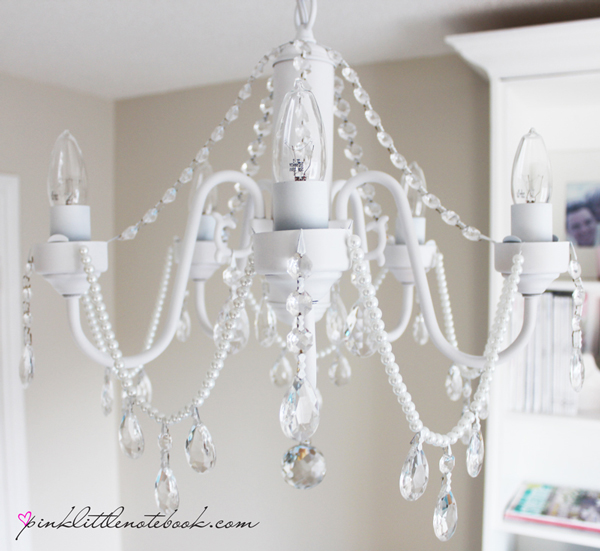
Then came the fun part. Time for some bling!

I actually lucked out in this department.  During a family dinner, I was talking about my chandelier project.  My (soon to-be) father-in-law (aka “Big Joe”) surprised me with a brown paper bag full of glass crystals from an old chandelier he had stored away.  SCORE!  I was so excited!

bagofcrystals

The only issue I had with the glass crystals was the brass colour of the connectors and hooks.  I bought a white paint pen to correct the issue.

paint_pen

I also went out and bought some glass pearls from Michaels.

crystals

To attach the crystals and pearls to the light, I considered a number of things that included drilling, soldering and otherwise creating a mess. But in the end, I just used a little hot glue and white wire to adhere everything to the chandelier.  It worked out perfectly

And there we have it, my very own DIY chandelier.

afterafter_chandlier

ChandeliercrystalsDIYDIY ChandelierpearlsWhite chandelier with crystals and pearls
Share Tweet

Sabrina

Sabrina is the design enthusiast behind the blog, Pink Little Notebook, where she explores her creativity through home décor, thrift store finds, DIY projects and her ever growing love to paint everything in sight! She is indeed a storyteller of style and has an extensive mixture of artistic skills and abilities which include everything from make-up art, graphic designing, painting, drawing, and even self-taught photography, just to name a few. Through her blog Sabrina combines everything she has learned over the years and hopes to inspire others along the way!

You Might Also Like

  • Before + After Makeovers

    Final Reveal: My Ice Cream Shop

  • DIY

    Finishing Details

  • DIY

    DIY Laminate Countertops

25 Comments

  • Diane K says: April 19, 2013 at 5:14 pm

    Amazing

    Reply
  • Tina @ Living Life Wright says: July 14, 2013 at 1:26 am

    Absolutely beautiful!! Well done!

    Reply
  • Ashley Frederickson says: July 17, 2013 at 6:04 pm

    This is so beautiful!! I want this in my room! Thank you so much for the amazing tutorial, can’t wait to try it!!
    xo,
    ashley

    Reply
  • Betty819 says: July 25, 2013 at 8:04 pm

    Oh, is that a beauty! Great job! I see you have popcorn ceilings too, like us. How did you paint the ceiling? They are in every room of our house. I have a feeling the painters spray painted ours for the previous owner to put this house on the market in 2005. This house was built in 1977, all popcorn celings and no celing lights, so original owners must have used a lot of swag lamps and also had lots of hanging plants as there are many hanging hooks in each room. Cost is too much to have the ceilings scrapped off and too messy to deal with at our ages. No way to get in attic to install a ceiling light fixture.

    Reply
  • Angela (Life in Velvet) says: November 3, 2013 at 10:51 pm

    This is so smart! I love your transformation! The spray paint attachment is such a great idea. Thanks for the advice!

    Reply
  • Arashiko says: January 9, 2014 at 5:02 am

    Ahhh…so lovely!

    Reply
  • Carie Spence says: April 24, 2014 at 10:52 am

    Awesome! I need to try this now. Such an awesome and cheaper way to get the look I want!

    Reply
  • Jen says: April 24, 2014 at 11:01 am

    WOW! Visiting from #ThrowbackThursdaylinkup and I am so impressed with your creativity. The chandy turned out awesome!

    Reply
  • Christine @ One TIPsy Chick says: April 24, 2014 at 11:16 am

    LOVE THIS! I found you at #ThrowbackThursdayLinkup. I co-host The Wednesday Roundup. I hope you will share this there too! Its not too late!

    Reply
  • Heidi Reads... says: April 24, 2014 at 1:39 pm

    Great transformation! I love your idea of using a paint pen to cover the brass hooks.
    #ThrowbackThursdaylinkup

    Reply
  • Erin Henry says: April 24, 2014 at 4:08 pm

    Beautiful! Love it! I’ve always wanted to give a chandelier a makeover but haven’t done it yet. You’ve inspired me to start hunting for a fixer-upper ;). #ThrowbackThursdaylinkup

    Reply
  • Tanya says: April 24, 2014 at 8:53 pm

    What a beautiful chandelier! I love it. I have a brass one in my dining room. I would love to do that! Thanks for linking up to #throwbackthursday link up!

    Reply
  • Betsy @ BPhotoArt says: April 25, 2014 at 11:24 am

    This looks lovely, I like how the white makes it more elegant!

    Reply
  • Thea says: April 29, 2014 at 2:07 pm

    This turned out stunning! It looks so elegant and updated. Thank you for sharing this!

    Reply
  • The Wednesday Roundup #23 - The Princess & Her Cowboys says: April 30, 2014 at 12:02 am

    […] 2. The Chandelier Saga Before & After by Pink Little Notebook […]

    Reply
  • The Wednesday Roundup Week 22 :: A Link Party says: April 30, 2014 at 7:05 am

    […] The Chandelier Saga Before & After by Pink Little […]

    Reply
  • Sandra {simpleispretty.com} says: April 30, 2014 at 4:23 pm

    Lovely, Sabrina! Great idea!

    Reply
  • Our Sunday Best Link Party and Features says: May 18, 2014 at 1:52 am

    […] Beautiful Chandelier Makeover from The Pink Little Notebook […]

    Reply
  • Rosemary @anitalianinmykitchen.com says: August 25, 2014 at 6:01 pm

    Your chandelier is so beautiful, I bought my beads, my chandelier is ready and waiting and I now have some inspiration from you. Thanks a lot.

    Reply
  • Kim says: March 14, 2015 at 8:25 am

    Your chandelier is beautiful. What a difference paint makes. I love chandeliers with crystals and beads. I have two fixtures that need a makeover. I definitely want to find some crystals for one that hangs over my dining table. I do not have anyplace to paint it inside so I am waiting for the warmer weather to arrive. Thank you for sharing your DIY.

    Reply
  • debbie says: March 14, 2015 at 12:11 pm

    ty for posting this. I have zero artistic skills. I have a house over 100 years old that I have been working on for 10 yrs. I have been looking for something just like this for my kitchen and bedroom. Everything is so expensive. I have seen plenty of the ugly gold chandleries but was afraid I would not be able to change them. Now because of your detailed pics and directions I feel I can. I will be on the hunt for one. Thanks again. People like you make it possible to live my dream in my money pit. lol

    Reply
  • Carol Paulus-Kalis says: March 14, 2015 at 1:14 pm

    WOW….this is the ultimate. I love it and I want to do the same thing. It is my hope to re-do a small chandelier like this for a powder room. I am going to save your information for when I am ready. Thank you so much. You are a magician ! ! ! !

    Carol P-K

    Reply
  • Remodeling DIY With Pinspiration for less - Cleverly Changing says: April 21, 2015 at 8:14 am

    […] saw a pin from the Pink Little Notebook and knew I had to try it on my […]

    Reply
  • DIY Crystal Chandelier (easy tutorial) says: October 14, 2015 at 9:51 am

    […] quick search on Pinterest led me to this pretty white chandelier, this gorgeous bronze chandelier by Jenna Sue, a rustic chandelier […]

    Reply
  • peyman says: October 26, 2016 at 1:06 am

    You have a great site

    Reply
  • Leave a reply Cancel reply

    Hi I'm Sabrina
    Follow @pinklilnotebook
    Follow on Instagram
    Follow pinklilnotebook

    Subscribe by Email


    • Popular
    • Comments
    • Tags
    • Yes! You Really Can Paint Tiles: Rust-Oleum Tile Transformations Kit

      May 16, 2014
    • How to Freshen up your Grout Lines (for $2 or less)

      June 30, 2016
    • Thinking about the BLANCO SILGRANIT Sink?

      March 5, 2015
    • Part 3: Home Office Reveal

      May 10, 2013
    • REVEAL ORC Week 6: Combined Living + Dining Makeover

      May 7, 2015
    pink little notebook DIY The Mod House Project Para Paints One Room Challenge Para Blog Crew 2014 bathroom bathroom makeover washroom IKEA kitchen before and after Pink Litte Notebook bathroom reno house remodeling IKEA hack baby girl nursery Wayfair Canada tile

    Find us on Facebook

    Projects by Room

    Basement

    Bathroom

    Bedroom

    Entry

    Exterior

    Garage

    Home Office

    Kitchen

    Laundry Room

    Living + Dining Room

    Nursery

    Staircase

    • About
    • Before + Afters
    • SHOP
    • Press
    • Contact

    © 2019 PinkLittleNotebook.com. All rights reserved. PinkLittleNotebook.com participates in select affiliate advertising programs. This means that if you click and/or make a purchase through certain links on this site or any related social media platforms, PinkLittleNotebook.com may make a commission from that click and/or purchase. All opinions are my own, and all brands featured represent what I personally like and support.