
It’s finished!!!!!! Oh sweet mother of renovation, IT IS FINISHED!! Our second floor guest bathroom is finally complete and I couldn’t be any happier with the results!!
For the past two weeks, day-after-day, and with hubby’s & big Joe’s help, a lot of time and energy went into updating this baby! It feels and looks like a completely new space!
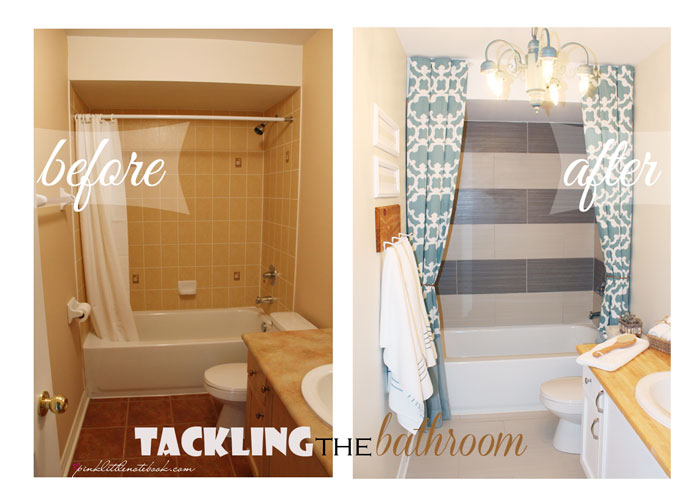
If you have been following me, you would have seen my two previous bathroom posts showcasing all the before pictures and the progress we made when we ripped out the tile. The “before” was dark, gloomy and depressing and now the “after” is nothing but bright, airy and fresh. I’m so excited to share this….soooo without further ado, here is the before and after transformation:
The Process:
The hubby and big Joe removed all the hideous tile from the floor and bathtub area. Unfortunately we were unable to save the drywall in the tub area. All construction supplies, including the repair of the drywall and the prepping and placement of the tile costs us $153.12.

I repainted the walls, trim and ceiling using some left over paint I had from another room. I used Benjamin Moore, Chatsworth cream for the wall and Simply White for the trim. I also used Benjamin Moore’s ceiling paint in white which cost me $20.00.

We installed new 12″x24″ bamboo porcelain tile in the bathroom. We used the colour Oyster on the floor and we used both Oyster and Walnut in the tub area. I’m a fan of using larger tiles in a smaller space; it just makes everything feel big and open! I found a fantastic deal on this tile at $1.89 a square foot. The entire tile purchase came out to $212.00.


The original vanity was in great shape so a little paint made a night and day difference in this piece. The counter top on the other hand, had to go. I replaced it with a butcher block counter top from IKEA which the hubby and big Joe cut to size for me. This cost $100. I also replaced the hardware. Lucky for me, my local Rona’s was closing down and everything was on sale, all hardware cost me $11.08 (what a steal!). I also replaced and changed the location of the toilet paper holder. This cost $9.99 from IKEA.

Using the existing builder’s mirror, I created a frame using baseboards and thumb tacks. Check out my post for step-by-step instructions. I love the impact this mirror made in the bathroom! Again, I purchased these supplies at Rona’s closing sale for $30.58.

This bathroom wouldn’t be complete without a chandelier, right?! I found this piece at my local thrift store. I didn’t do a thing to it and it actually set the tone for the rest of my colour palette. I love finding a good quality piece for $14.99, don’t you!

The towel bar, wall art and shower curtains were all DIY projects done by moi! I will be blogging about these projects in my next few posts. Here is a breakdown for the materials: shower curtain/rods purchased from Target & Fabricland $67.96; the towel rack $9.91; and wall art $8.46.


As for the accessories, majority of the stuff you see, I already owned. Any additional items I picked up costs me $16.00.
So that’s a wrap! What do you think, how did I do?
The grand total for my bathroom makeover is…drum roll please………….$654.12!
A bathroom reno for under $700? Now that’s not too shabby at all!


12 Comments
This looks fabulous! You talented lady. You and Mike deserve a big glass of wine!
Thanks for the comment Lindsay! We definitely had that glass of wine…or two!
Sabreeeee it looks so good. So fresh and clean looking. Good start to the morning definitely !
Yes it is and we’re definitely enjoying it! Thanks Natalie!
That looks wonderful! Congratulations on a clever and budget friendly reno!
Cheers,
Becky
Thanks Becky!
Nice job! What a difference. And what fun doing all the hunting for your great deals.
Thanks Kay! It’s a huge improvement…that’s for sure!
It’s gorgeous!! Fantastic job! Quick question, where did you buy your tile from? I love it!
HI Sabrina! I just discovered your blog today and absolutely love it! I was just curious what type of light fixture was in your bathroom before the reno. I currently have fluorescent lighting and I’m trying to find a replacement. The chandelier looks gorgeous but I’m not sure if it’d work in my bathroom as electrical is above sink and not in the middle of our bathroom. Thanks!
Thank you for sharing! What kind of plant is that on the counter?
Hi Briana, it’s an artificial green plant I picked up from the Dollar Store.