
Remember our staircase refacing project?
The one that is taking us forever to complete?
We’re back at it once again!

Finishing this staircase ourselves has been a huge financial savings. It’s also been one of the most time consuming projects yet. When you factor in the learning curve and the many things you have to do twice because you didn’t get it right the first time sometimes it makes you want to pull your hair out.
Now don’t get me wrong, finishing a project like this within a reasonable timeframe is totally doable. We just happen to be a bad example of it 😉

In my previous posts, I have touched on prepping our staircase, fitting the stair risers + treads, and staining the treads to match our existing floors.
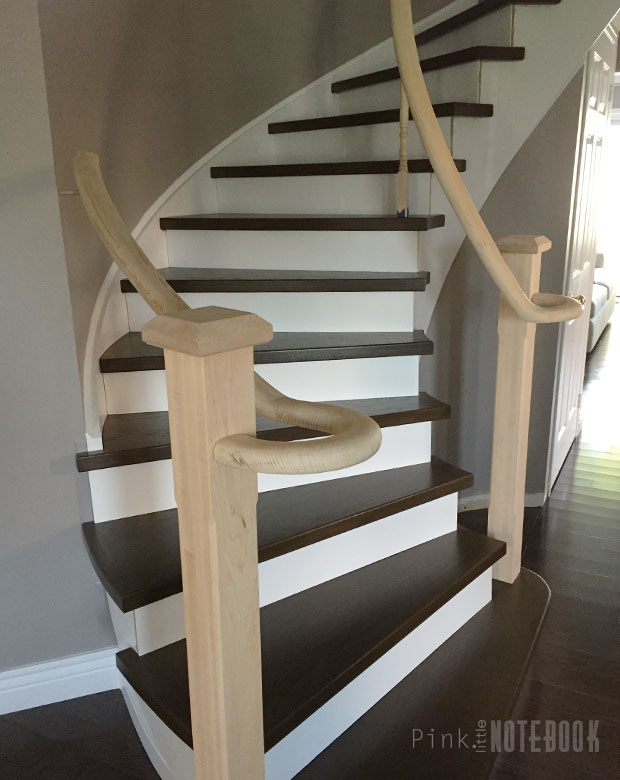
We’ve since installed the stair treads. One of the many easier things to do, may I add! And probably the most gratifying to see come together!

We began by gluing the white risers to the front of the step using PL Premium (permanent construction adhesive). Once glued in place, Mike nailed each riser at the top and bottom. For a clean finish, he strategically placed the nails where the stair tread would eventually cover it.

Next we added adhesive to the top of the step in preparation for the stair tread. We also put the adhesive under the stair tread for extra strength.

I debated for a quite sometime whether I wanted to switch out the balusters for wrought iron but in the end, I decided to keep our existing balusters.
However to make it feel like we updated the look, I did purchase newel posts with a square profile. These will be stained along with the railings to match our new steps.

We did come across another annoying set back—our railings.
Since we are reusing our previous railing, we needed to sand off the existing finish prior to staining, which we did…

It looked and felt like we sanded right down to the bare wood. When it came time to staining the railing, it was a different story. The stain was going on patchy and was not absorbing properly.
It turns out we needed more than just a sanding job on these railings, we needed a chemical stripper to make sure all the old finish was completely gone. Those of you attempting to re-stain your own railing, don’t bother wasting time sanding, use the wood stripper from the very beginning.
Once again, we removed all our railing and applied a wood stripper.

And we watch the magic happen right before our eyes. It lifted everything right out of the wood.

We stripped the remaining varnish (plus the one railing that we stained) and sanded down again.
This weekend we hope to finish all the staining and painting of the balusters. Hopefully without any more setbacks.
To fast forward to the staircase reveal, click here!


12 Comments
Seems like a very tedious job… but you guys make it look easy:) It looks really good!!
I love the look of dark wood and white on staircases! Very classy and beautiful 🙂
Wow! That’s a lot of work, and you guys did an amazing job! I’m not sure I would be able to do that myself. I don’t think I’d have the patience, and there would be lots of cussing, lol. Props to you for doing it yourselves!
Sarah
We were just discussing the work involved in doing this in our own home. I love the light and dark contrast. It would look so good in our home too. Want to come do mine next?! Joking! Looks like you’ve done a great job so far!
I have been waiting to see an update on the staircase!!!
Hooray! Good tip about the stripper.
OMG it turned out amazing! How gorgeous, I love your staircase! Before and afters are my favorite and yours turned out amazing! Doesn’t even look like the same room/house!
xo Adriana – Daily Dose of Design
Oh my goodness, it’s looking SO good! I LOVE the rounded staircase!!!!
Wow! The stairs came out beautifully. They look great.
LiveLifeWell,
Allison
I always said that the stairs increase the beauty of the house. Now the people started to put them on the stairs. Which enhance the beauty of the house. The color of stairs brown and white looks awesome. I also love the rounded stairs.
It looks amazingly beautiful!
I’m actually trying this myself with hubby and a friend. How did you finish the open end of the risers? I really hope mine turn out as beautiful as yours.
Where did you purchase your stair treads from
Wow, what a journey! Refacing a staircase is a huge job. Love the dark wood and white combo! It looks fantastic.