
Hey! Hey!
Can you believe it’s already been a month since our last project?
As you may have noticed, the past few weeks have been quite around here. The hubs and I put a halt to our work at home and actually took a break. It felt a bit unnatural for us at first but you soon realize that resting periods are crucial especially when you’re dealing with never-ending renos!
Feeling totally refreshed again, we are eager to begin our next project!

That’s right, we’re tackling this staircase!
If you’ve been following since day one of #TheModHouseProject we were suppose to finish this task before we moved into our home. Unfortunately, delays caused us to push things back. One thing lead to another and eventually we just came to terms that this staircase was not going to be complete.
So we’ve been living with an unfinished staircase this entire time. Not an ideal situation but we managed for the winter.
Let me bring you up to speed in terms of what has been done already. . .

Last year Mike and Big Joe removed all railings, newel posts, spindles and carpet on the staircase.

I pulled out ever single staple and nail from each step.
(A tedious job indeed. Only cost me a callused hand and a few days of extreme profanity.)
We hired a professional in the mean time, to come over and measure each step. He created our unfinished oak stair treads and MDF risers for our curved stairwell. They have been ready and sitting in our basement since November.
(Helpful tip: When I was looking for quotes, prices ranged from $60-$100+ per step. However, if you have a straight staircase (with no curving) you can definitely do the job for cheaper by using standard sizes which can be found at your local hardware store.)

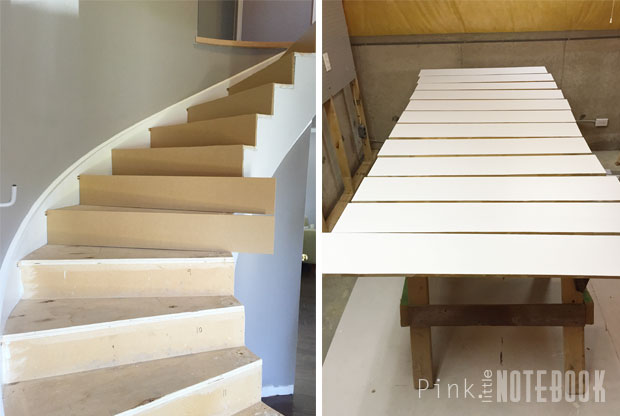
We also learned that the overhang on each existing step needed to be trimmed off in order for the new tread to be placed. So we did exactly that.

Since we were installing hardwood floors on the second floor, we had to add new noising in the hallway. This will eventually be stained the same colour as floors and stair treads.
That’s pretty much where we stopped last December.
No railing, no steps, a very scary situation!

So this past weekend, we finally began painting the hallway. We continued with the same colour from our main floor. If you missed my Instagram photo of Mike cutting the ceiling, be sure to check this one out.

We also cut all our MDF risers to size and painted them white. I’m persistent on doing as much painting and staining prior to install. It just makes life so much easier!
Next week, we work on the treads! 🙂
To fast forward to the staircase reveal, click here!


13 Comments
this is awesome, I just purchased a new home myself and I have green carpet on my stairs!!! eek!!!! So I will be stalking your site to see how everything turns out to get some major design ideas!!! I hope its as easy as you make it appear!! good luck and pray for me!!!!
Thanks so much Celineelise! I won’t lie. . . refacing the stairs is a tough and very time consuming job but it can be done! And DIYing will save you major bucks! Just take your time. Start your work from the very first step and work your way down. This way if you do make a mistake it won’t be so noticeable and by the time you get the last step you will perfect the technique. Congratulations on your new home 🙂
Very impressive
Thanks Sacha!
Looks good and can’t wait to see the finished project.
Thanks Tammy!
I love your blog and your staircase make over is so exciting!!
We have new stairs and I have decided to save money and do all the painting and staining myself and have already begun. So happy to see others doing stairs at the moment too. Yay!
If you want to see my stairs here is the link 🙂
http://landhousereno.blogspot.com.au/2015/05/staining-handrail.html
Cheers,
Nat
Hi Natalie!! That’s amazing! If you can DIY and save money. . . why not!! I’m definitely going to check out your link….this is so exciting 😉
You guys are so handy! I can’t wait to see how the stairs turn out!
Thanks Dana! Fingers are crossed for a successful project 🙂
Y’all are doing a great job! Sometime you have to take a break. I love the way your staircase is made. I can’t wait to see the finished project.
Thanks for the kind words JcCee! I can’t wait to finish this project ;p
It is looking good! That is going to look fantastic! I love a curved staircase!