
We’re making progress in our kitchen! As you may recall, our breakfast nook is getting quite the makeover. Recently we’ve installed this modern trellis wallpaper that added the perfect touch to our blank walls. Today I’m about to show you how we DIYed our very own built-in window bench.
Here’s what we did. Keep in mind the below steps are just a basic guideline. Measurements should be based on the dimensions of your walls, windows and/or angles since spaces differ in size and shape.
PRODUCTS USED
2″ x 4″ x 8′ Lumber (for framing)
4′ x 8′ x 3/4″ 1-Side Finished Plywood (for front panel & trim)
3/4” Cove Moulding
2-3/4″ Wood Screws (for frame)
2″ Brad Nails (for trim)
STEPS
1) Remove baseboard or moulding in your work area. If you have wallpaper like myself, to avoid any tearing, simply use a cutting knife and run it along the baseboard before removing. This will ensure a straight edge of wallpaper when you lift out the baseboard.

2) Determine the height of your bench. We wanted to achieve an overall bench height of 18″ (matching the height of our kitchen chairs). Since we are adding a 3″cushion, we reduced that amount from the height of the bench, which gave us a total of 15″ for the height of the frame.
Before you secure the back side of the frame, use a level and make sure everything is straight. The goal is to make the top portion of the frame as level as possible. If your floor is uneven, you may have to play around with the height of the vertical 2″ x 4″ to compensate for the unevenness. When screwing everything into place, we made sure we secured the frame into the joists in the wall. We located them by using a stud finder.


3) Next determine the depth of your bench. Measure the distance from the back wall to the front of the 2″x 4″. For our frame, we decided on a 15″ base. In order to achieve this, we made the frame 14-1/4″ which allowed us to apply our 3/4″ 1-side finished plywood giving us an overall depth of 15″. For our upholstered cushion we wanted an overhang of 2.5″ making our finished seat depth 17.5″.
Once you marked out the depth, you’re going to want to cut and attach the 2″ x 4″ which will span across the front of the frame from wall to wall. We also added joist between the base for added support.
One of the main reasons we didn’t create any storage is due to a floor vent located right in the middle of the bench. Our original plan was to vent it out from the face of the bench. However, after we finished the frame and right before we put up the finished plywood, we had some trouble locating the correct materials from our local hardware stores to do this. So we had to change direction and ended up relocating the vent all together. Since our basement is unfinished, we were able to move it right in front of the bench on the floor (which you won’t see until the next post since it was an after thought!).


4) The sides of the frame on the top and bottom that are located on the two angled walls were not mitred cut to fit into the back support of the frame due to uneven angles. We simply just secured the 2″ x 4″ to the joist in the wall for maximum support. We also made sure that it was levelled with the other 2″ x 4″ for a well supported bench top.

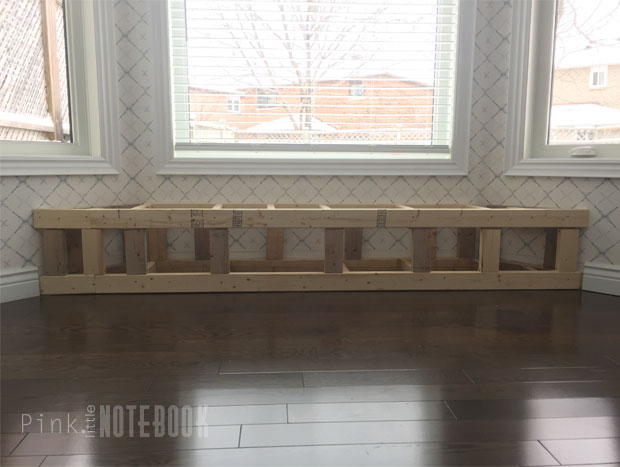
Our finished frame. Ready to be covered up!

5) To box everything in, we are using 1-side finished 3/4-inch plywood. Since the front of our bench is almost 9 feet, we needed two pieces. To cover the seam, we will be adding trim to the front. Also for either end of the plywood, be sure to cut the sides on a 45 degree angle. This will allow for a snug fit against the wall.


6) To create the trim, we used the same 3/4-inch finished plywood and cut into 2″ strips using a table saw. We nailed in the two longest horizontal pieces first, the top and bottom, using an air compressor and brad nailer. We cut smaller vertical strips to create the boxes.


6) To finish off the look and to cover the unfinished wood cuts, we nailed cove moulding inside each box.

8) Prep for painting! Fill in all the nail holes with wood filler and give a light sanding.

To avoid this post turning into a novel, check out PART 2: How to Upholster a Bench Seat.

*Click through these links to see more about our kitchen plans, kitchen sink, creating an IKEA island, how to disguise a kitchen soffit, a kitchen recap, about our wallpaper, DIY upholstered bench seat, about our kitchen chairs and our kitchen reveal.


9 Comments
I love this idea! Can’t wait to see the final product 🙂
WoW! Look great! U are so clever!
Hi Sabrina,
No. It’s not a novel! It’s fantastic. Can’t wait to see it finished. Thanks so much for sharing with us.
This looks incredible. I can’t wait to see how you paint it.
I can keep reading I don’t feel its a novel I love it.
Wow Sabrina this turned out fantastic. I love it.
I’m excited to give this a shot – far from a handyman, but this step by step guide is giving me some faith!
Wow! This is beautiful! I have an area so very similar. I really should do this, too. But handling a saw scares me.
Off the subject, what is flooring in this room? We have to replace ours as soon as possible. And has it faded any? We have a lot of light in this room
Looks great. Question: how far off the ground are the windows? Trying to see if I have enough room to try this in my kitchen.