
Hey all!
Some of you may be wondering what happened to the staircase project?! Since my last post about staining, we’ve installed our treads. I can’t tell you how great it is to finally have steps again!!! Now we’re just waiting to install the railings and balusters. I’ll post the remainder of the project once it’s fully complete.
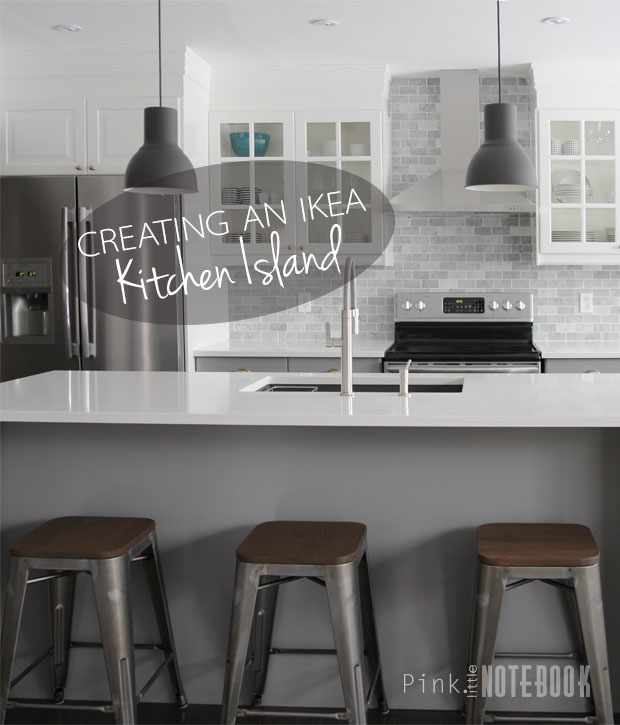
So, this week I’m finally moving on to the kitchen. The kitchen was one of the first things we started here at The Mod House Project and probably one of the least talked about spaces on Pink Little Notebook. Little by little, I’ll be sharing some clever DIY projects that took place in this space. https://www.grossmanmed.com/blog/levitra-online/
To recap, we fully gutted our kitchen late last year to update and create a new layout using IKEA kitchen cabinets. It’s a small space but we wanted to utilize as much as we could. To create more counter space, we built our very own 7 -foot island that is also home to our kitchen sink and dishwasher. Here’s how we did it. https://www.grossmanmed.com/blog/lasix-online/
UPDATE: I bought my kitchen just before IKEA switched to the SEKTION line so all my measurements are based on the AKURUM cabinets. Adjust accordingly.


Specs.
Based on our kitchen measurements, we have space to accommodate a 7′ x 3′ island. Before we began this project, we did have to relocate plumbing for the new location of the sink and dishwasher. Make sure you have that all set up prior to building an island. a

Create a base
IKEA base cabinets come with adjustable plastic legs, which are great if you have uneven floors. I used these plastic legs for my base cabinets up against my back wall (see image below), however, you CANNOT use these legs when creating a standalone island. You need to build a sturdy base to hold the weight of your island, especially if you’re planning on using a stone countertop.
We created a wood platform that is tightly secured to the floor. We used 2″ x 6″ wood, which will prop our cabinets up at our desired height of 36″.

The reason why we have this oddly shaped base is because of the dishwasher (located to the right of the sink). The dishwasher needs to be able to roll into place, whereas, the base cabinets need to sit on top of the wood platform. And then, in order to put our back panel up, the back of the platform needs to extend behind the dishwasher as shown below.

Mike and Big Joe make sure that the base is properly levelled and secured to the floor. This is probably your most important step right here. If it’s off, your entire countertop will not be levelled when it comes time for installation.

Back cover panel
Before we went any further, we did a dry fit to make sure everything fit perfectly. Then we began securing each piece, staring with the PERFEKT LIDINGO cover panel (H 96″ x W 36″) which we trimmed to 84″. We secured this back panel from the inside of the wood base.

Base Cabinets
Next, we placed the cabinets on top of the wood platform and secured them down using a drill.
Now, here comes the confusing part. The reason why our platform is 5″ shorter than the base cabinets is to allow room for the front legs of the cabinet. You know, the ones I told you not to use!
We include the front legs only, which we are using strictly to attach the toe kicks (IKEA toe kicks snap on to the plastic legs).
If we didn’t have a dishwasher, I would have just nailed the toe kick to the wood base. Since we do have a dishwasher, we need easy access to get underneath the appliance if anything needs to be repaired or replaced in the future (extremely important!!).

Here’s a close up of the legs and toe kick (PERFEKT LIDINGO plinth, 88″ x 4″).

The below image is our old dishwasher which we ended up replacing with something a little sleeker. However, you could see how everything started to come together.

Side Panels
Using another PERFEKT LIDINGO cover panel cut-to-size, we created the side panels using the below measurements.


The panels were secure in place with heavy duty brackets which were placed inside the panel wall and along the floor hidden from view.


Since the toe kick (PERFEKT LIDINGO plinth, 88″ x 4″) have finished edges, this makes them perfect to complete the front of theses boxes. To secure them, we used wood glue and finishing nails.

After we completed our structure, we waited for our quartz countertops to be installed (purchased through IKEA as well). In the end, we were so happy with the results. The island is extremely sturdy and our countertops and sink were the perfect finishing touch.
If you want to take this one step further, you could use the toe kicks to create box panels on the sides of the island simply by nailing them in place. Not only would the added detail look amazing but would pair up nicely with the shaker cabinets. Something we are considering for the future!

Would you create your own kitchen island?
*Click through these links to see more about our kitchen plans, kitchen sink, how to disguise a kitchen soffit, a kitchen recap, about our wallpaper, DIY built-in bench, DIY upholstered bench seat, about our kitchen chairs and our kitchen reveal.


72 Comments
This is amazing! I dream of the day I can design my own kitchen! (Super pumped because my boyfriends mom designs kitchens for a living!) Haha but the colors here are perfect and brighten up the room so much! White makes all the difference in certain spaces! Especially in modern design!
You totally lucked out Ariel!! That’s amazing 🙂
How did you make the 4″ plinth work on the 6″ base?
Good question!
You make it look so easy! I would love to have an IKEA kitchen. Yours is gorgeous. And I love the gray!
I am SERIOUSLY impressed. Your kitchen looks amazing.
The island really completes the space.
Wow this is amazing and so beautiful,! You are blessed to have people around that can do this type of work! Thanks for sharing!
Valerie
Fashion And travel
Wow. This seems easier than I would have imagined. I love the final look! That faucet is so pretty…
Great post. The details around the base and toekick and accommodating the dishwasher are super helpful.
We have yet to do our full kitchen reno, but we added an island to make it a little more useable (see https://homeon129acres.wordpress.com/2013/04/07/my-own-private-island/). I bought the doors at Habitat and then had our cabinet maker build the boxes. We DIYed a wood countertop, so it’s a big mix of custom, reuse, and DIY.
I love your kitchen island Julia!! It’s such a large functional space. I’ve recently discovered Habitat such a great store! Thanks for stopping by 🙂
I love the idea of creating your own kitchen island! By the way I love the overall look of your kitchen!! http://www.littlemissfangirly.blogspot.com
I love Ikea! This island is beautiful, as is the rest of your kitchen! Thanks so much for sharing 🙂
I love your before and after pictures. That looked pretty complicated but the results are probably well-worth it!
I just found your blog and I love it so far! We just finished doing an ikea kitchen with the new system. I just wanted to comment to say that it seems like they did change up the toekicks. They are actually plastic this time and the edges aren’t finished on both sides. 🙁 otherwise everything else seems to be constructed the same way! Nice kitchen!
Hi Laurel! Thanks so much for the info. I’m shocked they changed the toe kicks to plastic ones. I found the old toe kicks super useful especially if you needed random filler pieces in your kitchen. That’s too bad. This definitely has me curious to check out the new details in the SEKTION line. Thanks so much for stopping by:)
Hi there,
I am in the middle of a kitchen reno and I was thinking of DIYing an Ikea island so this was very helpful – thank you!
Quick question: I see that you have an 8″ overhang for seating. Do you find that that it is enough to sit comfortably for you and your guests? Most kitchen places recommend around 15″ but that seems almost excessive to me!
Hi Sydney,
You are definitely correct that the sides of my island come out 8″, however, I forgot to mention that my countertops come out an extra 2-1/2″. All together my island overhang is 10-1/2″. The minimum overhang recommendation is 12″. We didn’t have the space to come out further and I personally find that we have more than enough space. Keep in mind that if you want to use chairs with a back, it might look funny because you don’t have the depth to push them in. That is why we opted for stools. Hope you find this helpful!
Ah good to know! I also have a very limited amount of space for seating (also around 10″ or so) and it hadn’t occurred to me about the stools vs. chairs. Thank you!
Hi Sabrina,
We are building our Ikea sektion island this weekend and your post has been very helpful!! Thank you!! Quick question- did you use any brackets to support your 10.5″ countertop overhang? We will have a 12″ overhang (of a total of 36″) with a granite countertop and we will likely need brackets. Any thoughts on how we could go about it? We are thinking of a few vertical 2×4’s that will be screwed to the bottom 2×6 base and the cabinets.
Thanks!!
Krishna
We are in the process of planning an island.This was so helpful. Love your stools. Where did you find them?
Glad you found it helpful Margie! I bought the stools from Target.
Great Post! I’m installing a nearly identical island in my home. Quick questions: I mentioned you used 2 x 6’s for the base (which are actually 5.5 inches high), but the toe kicks provided by ikea around only 4.5 inches. Is there a gap between the top of your toe kick and the bottom of your cabinets? If not, how did you make up for the extra space? If so, is it noticeable? Thanks!
Hi Zach, yes there is a small gap up top which is not noticeable at all. In order to see it you need to kneel down with your head on the floor. We also left the minor gap because it give you just enough room to stick your fingers in which allows you to pull out the toe kick easily for cleaning purposes or to access the bottom of your dishwasher. Without the gap, you would probably have one heck of a time trying to pry the toe kick out. Hope you find this helpful and good luck with your kitchen island!!
Hey Sabrina!! We built our island using your plans and are loving it. We havent done the toe kick yet. You used the ikea legs, which are 4.5, did you have to add a wood piece to extend them to reach the cabinet and floor. Thanks!
Hi Sarah, so glad my post helped you!!
Yes we did use the Ikea legs and toe kick. We placed the toe kick so that it is flush with our floor. So there is a gap between the top of the toe kick and the cabinets. However, you can not see the gap. In order to see it, you literally have to lay down and put your head on the floor. Hope this helps!
Hi Sabrina,
I would like to first say “awesome blog” I am in the middle of an Ikea renovation in my kitchen and I was perplexed about how to fasten the Island to the floor. Ikea is lacking the instructions there.
On another note I love your backsplash. Do you have the details on it?
Thanks!
Gina
Thanks so much Gina! Glad you found it helpful! The backsplash is a 2×4″ marble subway tile with white grout. It came in a 12×12″ sheet which was fairly easy to work with. I’m pretty sure you can find this type of tile in most stores. We got it from our local tile supplier.
Hi Sabrina,
Beautiful kitchen. Can I ask what kind of flooring you have? Color/brand? Thanks!
Hi Lisa! The floors are red oak hardwood in the colour charcoal. They were ordered from a local supplier. Hope this helps!
Hello Sabrina
Great job. We are about to install an almost identical kitchen. Overhang of the island will be similar at 12”. I noticed you wrote that the plumbing should be in place before start building the island, but I don’t see yours in the pictures. I was thinking of roughing everything in first and then drill in the floor for plumbing to be sure it comes out where needed. What are your thoughts?
P.S., did a pot filler cross your mind since the stove is on the other side? it is not really necessary but it is so easy to do now that everything is open. Maybe excessive but I think it might add resale value for a buyer that values kitchens
Hi Christopher, sorry I should have clarified our process a bit better. We had to relocate the pipe lines in our basement. Once we did the rough in and knew where we wanted everything to come out, we drilled the holes into the kitchen floor prior to starting the island (it’s difficult to see it in my pictures). We didn’t stub the actual pipes through the holes until we had the cabinets in place. It’s easier to drill the holes in the cabinet afterwards versus trying to fit the cabinet over the pipe work. Hope that makes sense. We would have loved to do a pot filler but due to time constraints, we didn’t add one. If you’re able to put one, I would definitely go for it!
That makes total sense. that’s what I thought too. One last question. I really like the idea with the toekicks finished edges to work as a column. But on the other hand I would rather do less than more. do you think it is worth it? did you try it with and without and you came to decide that with the columns on the island overhang is better?
Thanks!
I personally just like the look of the columns on either side and that is why I added them. It also supports the countertop a little more. However, with that being said, they don’t need to be added. It’s just a matter of preference!
Hi Sabrina, Very nice job on the island! I’m in the process of finishing off our Ikea Sektion kitchen and will start on the island in the next few days. It will be almost identical to what you’ve put together, which is extremely helpful. Question, Could you please let me know how you secured in the dishwasher? I see a piece on top that is connected from the middle cabinet over to the cover panel. thanks!
Hi Alex, Thank you! The dishwasher itself is secured with screws from the inside. We did add a cover piece on top to of the dishwasher to cover a small gap under the countertop. To do this, we used the leftover material we had from our side cover panel (which we cut to size) and secured with l-brackets from the inside. Hope this makes sense!
Thanks Sabrina!
Nice island. How do you anchor the 2×6 wood frame on bottom to the concrete or how did you do it?
Hi 1314Studio, We have a wood subfloor (not concrete) so we secured by screws and L-brackets.
Sabrina,
Thanks for this great idea to use 2x6s for the Ikea island base. I am going to make my island in the next few weeks.
I was using your dimensions to plan my base, In the planning process, I noticed, that your dimensions for the base were off the edge by few inches. I understand why you went with 5″ in the front, however, I am not sure why you decided to have 2 inches off the sides. I got stuck here. 60 in total for two cabinets, but the base is only 56″ wide, leaving 2′ potentially on each side. Can you help me understand the need for those two inches. Thanks.
Hi Sabrina, Your instructions are great! What a helpful post! I was wondering how you prepared the tops of the cabinets for the quartz countertop. Did you secure a piece of plywood or just mount the top directly to the cabinets?
Hi Adrienne,
Thank you! The counter-top installers just mounted the quartz right on top of the cabinets. You just need to make sure your cabinets are secured to the platform really good and the platform is secured to the floor very well.
How did secure your cabinets to the platform?
Hi James, we screwed the bottom of the IKEA cabinets right into the wooden platform.
Again, I am just joining your site. Like so many others, your island is drop dead gorgeous. Yes, you are so lucky to have family that’s capable of doing this type of work, and does it!
i love your island. but i was wondering how and where did you put the lines for water to use for the sink and dishwasher and the power line for the dishwasher?
Hi Omar, we have an unfinished basement so we were able to relocate everything fairly easy. We didn’t fish the pipes through until the cabinets were in place.
Beautiful kitchen what is the name of your backsplash? I love it!
Thanks so much for sharing this!
I’ve been planning our kitchen remodel for years (…..seriously…..years!!!), and have been planning on using Ikea base cabinets for our island, but just today realized they were only 30inches high! I was starting to have a little meltdown thinking (yet another) kitchen plan wasn’t going to work, so I Googled “making an island with Ikea cabinets” and this post came up. When I saw the base you built, and reading that you did it for security, but also for making the island reach the “desired 36inches” I was so happy! It’s such a simple fix, but one my brain clearly wasn’t going to come with on it’s own! 🙂
Hi Amy-Lyn, thanks so much for your kind words! Glad I was able to help. Happy kitchen planning 🙂
Beautiful kitchen just wondering what was the cost for moving the pipes so you put the sink on the island ?
Hi Rachel, luckily my husband is a licensed plumber so he moved all the pipes himself. I’m not sure what the going rate is, I would call around to compare prices.
Hello Sabrina, Great tutorial!
Quick question –
The cabinets (30″ tall) are supported by 2×6 (so 35.5″ tall now) however you mentioned the back cover panel is 33″ wide. How did you manage to have your cover panel be flush to the cabinets when they were installed when they should actually have been 2.5″ short? Does Ikea make a cover panel 36″ wide maybe and you cut it both ways?
any info is much appreciated!
Thanks!
Hi Daniel, My apologies I made a typo in my post that I didn’t catch. The Ikea cover panels are actually 96×36″ (not 96×33″). With the new IKEA kitchen line, I believe the cover panels come in a variety of sizes now.
Thanks for this blog!! It’s been so helpful with our kitchen island install.
Wondering what blade and or saw your husband used to cut the cover panels?
We’ve been trying to find something that will make close to perfect cuts, and haven’t been successful.
Hi Sabrina,
Did you only attach the cover panel to the wooden base? Did you have anything keeping it in place at the top of the cabinets?
I have planned my island similar to yours. We purchased the dishwasher from ikea and got the fake cupboard front but there is nothing provided for the side panel. How did you affix yours? I can’t quite see the front in your pics. Thanks for posting this….it took a bit of time but my hubbie finally realized the benefit of the 2x6s. Thanks!
Hi Pam,
Are you referring to the side panel on the left of the dishwasher? If so, we secured it to the edge of the 2×6″ that reaches across the back and we also used heavy duty L-brackets on the inside attaching the side panel to the floor. If you have any other questions, please feel free to email me! Best of luck!
Hey Sabrina – I might be totally missing something here. I am in the process of designing our kitchen island with Ikea’s cabinets..
Raising your island to put your cabinets at 36″ is ideal because the cover panel is already 36″ wide. However, with the countertop on top does this create an island that is an inch and a half or so higher than your main kitchen counters? As far as I’ve read the legs on the cabinets are only 4 1/2″ tall? Or do they extend further than that and you put your main cabinets at that height as well?
Hi Jessica, yes our kitchen island is exactly an 1 1/2″ higher than our main kitchen counters. We wanted the extra height on the island since we were adding stools and just to save our backs when washing dishes. With a 4 ft distance between the two counters, you barely notice the height difference at all. All the best!
Sabrina,
We are in the process of installing an ikea island comprised of three base cabinets (18, 24, 36 inch respectively). We got the 36×96 cover panel and will need to cut it so that it is 78 inches. My question is what you did once you cut it to hide the exposed wood? Did you use touch up paint or was there a trim piece?
Sabrina,
Thank you for the nformation in your blog.
We are in the process of installing a similar peninsula with dishwasher at the end just like you.
Question :
As there is no leg next to end gable how did you fix the the end of the toe kick?
Thank you.
John
Hi John,
The toe kick in front of the dishwasher is not fixed to anything. It stays in place because of the other legs along the front. It sits solid and still allows for easy access to the dishwasher if needed.
Thank you
Thank you so much for this post!! I have already ordered my IKEA cabinets for the back wall AND island, and am waiting for them to come in. Today, I was reviewing my order “one more time” and was flipping out that I had not ordered any legs for the island – this post cleared things up for me and gave me peace of mind and a great understanding of what will have to happen.
Beautiful kitchen! I hope mine looks like it in the end!
Thanks so much for your sweet words and all the best with your new kitchen!
Hey just a question for you,
Do the legs sit above the floor a little and the base can just click to them?
Also did you need to cut 1/2 inch of the length of your cover panels.
My problem I’m facing is how to cap the end because the toe kicks are now plastic 🙁
Thanks for post gave me a good visual of how I wanted to build the island.
The toe kickboxing 4.5 inches tall and the 2 by 6 you used would be 5.5 inches. What did you do to cover the extra inch?
Hi Henry,
Yes, there is a 1″ gap up top which is not noticeable at all. In order to see it you need to kneel down with your head on the floor. We also left the minor gap because it give you just enough room to stick your fingers in which allows you to pull out the toe kick easily for cleaning purposes or to access the bottom of your dishwasher. Without the gap, you would probably have one heck of a time trying to pry the toe kick out. Hope you find this helpful!
Thanks.so.much. great artil BTW very helpful
I’ve been looking for something exactly like this! I want to build out the end panels on my builder-grade island. Can I ask for some more detail on how you attached the smaller pieces of the end panels? How many L-brackets and where? Thank you!
Great blog and great post!
I plan on doing a similar kitchen island with the dishwasher at the end.
Was the end panel next to the dishwasher flimsy at all? I’m just having a hard time picturing how the end panel was affixed to the rest of the island to be structurally secure.
I hope you can shed some light 🙂
Thank you
In a comment above she mentions that she added an l bracket to the end panel and screwed it down the floor.