
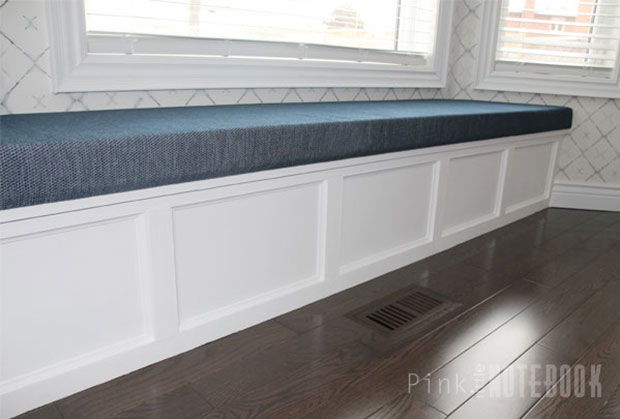
Last week I posted about the built-in window bench we created for our breakfast nook. I must say this new addition is looking pretty good! For added comfort, I definitely wanted to add a seat cushion, however, this bench top almost expands to 9 feet. Paying an upholsterer to make a custom cushion would end up costing me big bucks. Instead, I figured out a way that I could easily do it myself.
Now let me start off by saying, I have dabbled in small upholstery projects in the past. I never really realized the importance of fabrics until I reupholstered a set of kitchen chairs. In less than one year (with daily use), my fabric was fraying.
After spending hours measuring, cutting and stapling new fabric to these chairs, watching my hard work go down the drain was heartbreaking and frustrating. I obviously didn’t pick the right textiles.
So you can only imagine as I attempt to upholster a bench cushion this time around, I’m a little more aware and choosy with what I use.

When it came down to picking the right upholstery-grade fabric, I simply went with the best. Sunbrella fabric, as most of you know, is hailed as the best outdoor fabric on the market. You know if it’s strong enough to be outdoors than it will take on everyday kitchen use with no problem.
These fabrics do have multiple uses (other than just being used outdoors) and hits every key component I was looking for—highly durable, water resistant, fade resistant, easy to clean and, of course, great looking. This fabric is 100% Sunbrella acrylic and I definitely don’t have to worry about fraying.

PRODUCTS USED
4′ x 8′ x 3/4″ 1-Side Finished Plywood (for bench top template)
3″ High Density Foam (pre-cut to size)
3.5 yards Sunbrella Tailored Indigo (42082-0017)
4 L-Brackets
4 Nail Plates
3/4″ Brad Nails
1″ Plywood Strips (finish trim)
STEPS
In my previous post, we already measured and cut-to-size the bench top using 3/4″ plywood. Our frame depth was 15″ plus we added 2.5″ for overhang, totalling 17.5″ for our finished bench depth.

Since we are dealing with such a massive bench top, it was just easier to order the high density foam with the exact measurements already cut-to-size. Remember to always order the foam at least 1″ wider on all sides. When pulling everything tight this gives you enough play that when you’re actually sitting on the bench, you won’t feel the plywood template on the back of your knees.

Once you have all your materials ready, begin by placing your fabric out flat, face down on a clean work surface. Put the trimmed foam and plywood template centred on top of the fabric.
For this particular project, I did not use batting as I wanted a perfectly squared edge. If you’re looking for a finish with a soft rounded edge, then be sure to pair the foam with batting.

Since our bench top is longer than our 8 foot plywood sheets, our template was created with two pieces. To connect the two pieces together, we used nail plates on the seam for maximum hold.


Fold the edges of the fabric on top of the plywood and staple with a nail gun starting from the centre and working your way out. Be sure to pull the fabric up evenly as you go. Leave the corners for last.

Once the fabric is stapled around the sides, flatten and fold the corners as you would with gift wrap. I brought the fabric up on the diagonal to make a corner fold, and held this in place with one hand while tucking the excess fabric on the floor snug against the width of the foam and board neatly stapling it down. Trim any excess fabric to make it easier.


Place the newly upholstered bench top on the base. To secure in place, we used L-brackets every 2 feet attaching the bottom of the upholstered seat cushion to base. To cover up the L-brackets, we used an extra piece of 1″ trimming we had and nailed right to the face of the bench.

Keep in mind that you actually want to paint the base prior to attaching the cushion so you don’t have to tape everything up. However, we had some last minute changes to our floor vent, which set us back. With baby in the picture and limited time, we decided to keep things moving by installing the bench top since we had it ready to go.

The original idea for our vent was to have it come off the face of our bench. However, we had trouble locating the right materials to do so. Instead we decided to relocate the vent all together by moving it on the floor in front of the bench. Thanks to our unfinished basement, this made it possible to do.

And I’m kinda loving the flush mount floor register which I stained the same colour as our floors!


We’re finally in home stretch! With the bench complete, I can now focus on putting this space together.

What do you think so far?
*Click through these links to see more about our kitchen plans, kitchen sink, creating an IKEA island, how to disguise a kitchen soffit, a kitchen recap, about our wallpaper, DIY built-in bench, about our kitchen chairs and our kitchen reveal.

Disclosure: I’m thrilled to have collaborated with Sunbrella in this kitchen bench. I was provided with fabric for this project but all views, opinions, and of course, countless hours spent cruising their awesome fabric collection are truly my own.


4 Comments
Hi Sabrina,
Wow! Love denim. It works great with the colours in that area: white, grey and the floor. Your step by step tutorial is really clear and helpful. Thanks for sharing this.
I wasn’t expecting denim but it looks amazing.
Oh wow! Well done you. I think it’s a really smashing job.
Your window seat is absolutely fabulous. I love e-v-e-r-y-t-h-I-n-g! Now can you please please come to my house and help me get my house looking fantastic like yours?