
When we moved into our current home, I knew we needed to do something with our dated curved staircase. The carpet covered stair treads were on the way to its death bed—stained, matted and full of dangling threads—there was no easy fix.
Cruising the Internet and looking at staircase inspiration, the hubby and I had the brilliant idea to remodel our own staircase. “How hard could it be?”, we thought. After all, it’s not uncommon for us to take on pretty adventurous renos we have never done before! https://riverviewfacialplastic.com/generic-cialis-online/

So we set forth in October 2014 and ripped out our entire staircase. Little did we know that this project would drag on for the next year causing us to live with plywood steps and no railings.

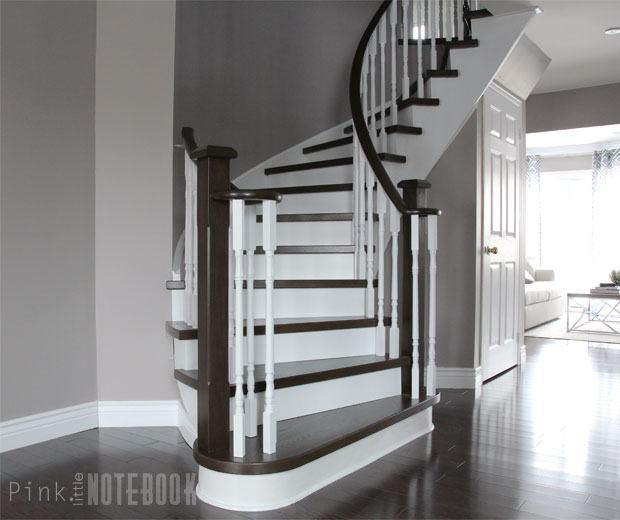
Finally our happy ending came just before Christmas (2015). The once hazardous staircase is now fully functional, upgraded and safe.
Looking back, I do see all the areas where we went wrong. We would have never been able to foresee half of those issues due to lack of experience.
Would I try to accomplish a project to this magnitude again? Maybe. If it’s years from now and this project becomes just a distant memory. As of right now, as discouraging as this may sound, this is probably one of the very few remodeling projects that I would say, “just leave it to the pros”.

If you want to start from the beginning of this project, you can catch up here:
Prepping our staircase (Part 1)
Fitting the stair risers + treads (Part 2)
Staining the treads (Part 3)
Installing stair risers and treads (Part 4)

The final step!
After we installed all the stair treads and newel posts, we thought we were so close to the finish line. The last step was to paint and install the balusters.
So we painted everything white and brought them back into the house. Only to realize yet another mistake. We didn’t number our balusters when we took them out a year ago. It was quite a challenge (not to mention, extremely time consuming) to figure out which ones went where.

Once we sorted through that mess, we began installing the balusters on the three shortest rails (the two on the second floor and one on the main floor). We measured, marked and drilled the holes.


During this process, we made one minor adjustment—rising the height of the railings. We did this because we originally had carpet upstair, which we switched over to hardwood flooring. That meant the new thickness of the floors bumped up the balusters, which in turn, also bumped up the railing height.
At this point, we were feeling good. We had one last rail to install! This was the longest rail, the one that curves from the bottom of the steps right to the second floor. . .

But then this happened!
As we began drilling holes on the first few steps, we realized something was off, which made us stop immediately. We measured a dozen times and noticed that the balusters weren’t lining up with the stair treads.
After a few days, we eventually came to the conclusion that the railing needed to be cut to pull the bow in tighter. The new nosing and newel posts that we installed on the second floor changed the position of the rail completely. Something we didn’t even realize.
Since we were at the very end and we spent so much time trying to perfect this staircase ourselves, we threw in the towel and decided to get a professional in to do this final installation.

It would have taken us weeks to find the correct radius of the curving rail versus a professional who could fix it in one day. He advised us our biggest mistake was removing the posts and rails, he said they should always stay in place (if you are reusing them). Just to prove to you that this was no easy clean up, it took him roughly 8 hours to fix our mistake on this ONE rail!
Although we cheated in the end, there was one big positive about doing this project ourselves. We saved huge money! After talking to the pro who helped us, I asked him how much a typical project like this would cost. He blew my mind when he said around $8,000. I guess I can now see how much time and expertise goes into these sorts of projects. In total, we spent roughly $2k including materials and the last minute service call. That’s a savings of nearly $6,000!

I am definitely happy it’s over and knowing we saved that much money did make some of the headaches go away.
In the end, I learned that tackling a curved staircase is unlike tackling a straight staircase. You can’t get away from the fact that anything curved is a custom part that needs to be custom fitted. It does take more time, money, skill and patiences to complete. However, it is totally doable even if you do have to call in for help!


Next step, infusing this empty hallway with a little artwork!


27 Comments
What a huge difference! You guys did an amazing job. Kudos to you both for tackling that project. It looks so fresh and complements the rest of your home perfectly 🙂
Thank so much Amy! We lived so long without a proper staircase so it’s definitely nice to see it all complete 🙂
It’s a huge transformation Sabrina! High fives for getting as far as you did – that was a challenging project! You must be thrilled with your hallway now. It looks completely different from the first photo!
You have no idea how thrilled we are 🙂 Although it took us forever to complete, its these types of projects that are most gratifying in the end. Thanks for stopping by Jen!
Wow! It looks amazing and completely transformed! I love the dark wood against the white. You guys did a fantastic job.
Thanks so much!!
Wow that looks amazing! I don’t think I’d ever be able to do that.
That looks amazing!!! Wow! You did a fantastic job. I love the contrast.
oh gosh it looks so bright and airy now. That sounds like a hard project to take on! Good for you for doing it!
Wow, what a beautiful transformation! You guys did a fantastic job. Way to go!
It looks gorgeous! What a difference it make in your foyer. Staircases are expensive. We put a solid oak staircase in our basement and it cost $5,000. It’s beautiful and I don’t regret having it done.
You’re right Tammy!! Staircases are definitely expensive but it’s also a great investment for your home and always well worth it in the end! Thanks so much for sharing 🙂
I love your paint color selections and your hacks it all looks amazing.
Thanks so much Rose! We tried to match the stain on the oak stair treads to the colour of our floors. In the end, we loved how it turned out!
That is beautiful! You should put the before and after photos side by side for an even better effect. Great job!
Such a huge transformation!! It turned out so beautifully! I think the entry/hall as a whole turned out so wonderful! Thank you for sharing the how to and before and after!
wow you guys did a such fantastic job! the staircase is so stylish and chic now!
WOW this is amazing, doesn’t even look like the same house! Love it!
Sabrina, fantastic job!! You didn’t mention the company that did the curved treads for you.
I live in Ontario. Can you share the name of the company please?
It is absolutely stunning. You guys made a good call and you should be proud.,
I just joined your site and have to tell you, The results of your staircase are absolutely gorgeous. We have a staircase very similar to yours, I’ve prepped it and already painted the portion of the steps white like yours. I will be staining the portion of the steps we be walking on. I know I will have to stain every other step so we will be able to go up to our bedrooms. However, I have the dark color stain like yours and a lighter color stain. After taking a closer look at how gorgeous your steps are I am moving more into that color direction. I am happy you stated in your blog that the professional told you the railing should not have been removed, because the first thing I said when I saw your step, “why did they remove the railings to stain and paint?”.
Your results are breathtaking! Thanks for sharing
Thanks so much for your kind comments Ivory!!
We originally had carpeted steps. We had to remove the carpet and create new oak stair treads and risers so that’s why we ended up removing the rail. This project was a huge learning curve for us but we are so happy with the results.
Let me know how your staircase comes out!!
Great Job!!! wonderful ideas to modify curved staircase. Thanks for sharing.
Hi. We have almost the exact staircase. My question is whether the stairs are slippery without carpet?
Hi Susan,
Good question! I suppose they could be slippery if you applied a gloss finish but I used a satin finish on my wood treads, they are not slippery at all.
I absolutely love your final result. As we are looking to do something similar, I was doiing a lot of looking and am astounded that you accomplished this with our much professional assistance. I am now looking for $8000!!!!!!
This is a stunning makeover of yours. This is amazing, Your staircase remodel is awesome. It looks simple but great and awesome. Thank you for sharing this one.