
A kitchen soffit (aka bulkhead) is something that majority of us have in our kitchens. They are often created to hide wires, pipes or other mechanicals in our kitchen. Sometimes they are even there to just fill the space above your cabinets. Either way, I personally find most soffits can make a home feel dated and extremely closed-in.

When it came to our kitchen renovation, we had no idea what was behind our soffits. I debated whether or not I should remove them or somehow just work with them. Ultimately, I really wanted ceiling height cabinets and finally decided that the only way I knew if I could get them was to remove everything. And that’s what we did. https://theaffordabledental.com/cialis-online/

As it turns out, we did have pipe work running behind our soffits in one area. So here’s how I came up with a simple yet effective way to get the look that I was after—all while trying to camouflage that dead space above. https://theaffordabledental.com/metformin-online/

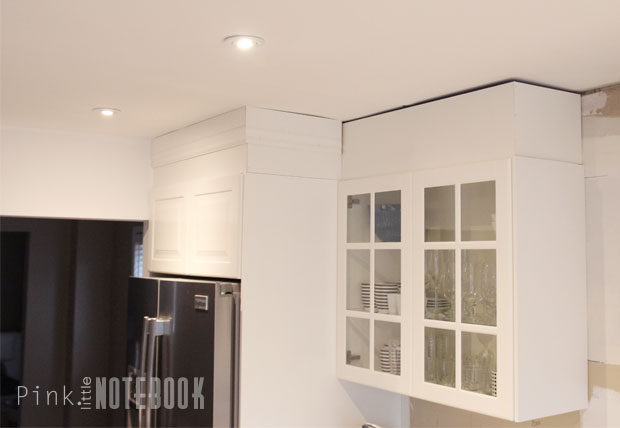
To create our flush box, we used 5/8″ MDF board cut-to-size. Leaving about an inch from the top of the ceiling makes it easier to grip the panel when installing. https://theaffordabledental.com/generic-propecia/
Prior to securing the pieces in place, I painted everything. After a little research and testing, the perfect colour match to the IKEA white cabinets is Simply White from Benjamin Moore.

To install the box, we started with the front panels. You want to make sure the panel is completely flush with the inside of the cabinet (not the doors). To secure, use a nail gun from the inside edge of the cabinet shooting straight into your MDF panel above.

Since you can’t do the same technique for the side panels, you must nail directly into the side of the other panel as shown below.


To add decorative detail, we added some left over baseboard trim to the top of the box. This will also act as a way to close the gap at the ceiling.
The key to putting this up is not to use extreme pressure. Although your box is pretty secure, it’s hallow in the middle. If you push with all your might, it could cave in. Holding your baseboard normally and nailing it into the panels will not move a thing.

To secure this, we used the nail gun around the entire premises of the trim.

For this next step, we added a shoe mold around the top edge for added detail. We used construction adhesive to glue it on.
After everything is all said and done, any nail marks, edges, inner corners and ceiling gaps were filled with DAP filler. I then sanded and retouched all the paint work afterwards.
And we ended up this, our very own custom kitchen soffit that looks like part of the our cabinets.


What do you think?
*Click through these links to see more about our kitchen plans, kitchen sink, creating an IKEA island, a kitchen recap, about our wallpaper, DIY built-in bench, DIY upholstered bench seat, about our kitchen chairs and our kitchen reveal.


21 Comments
This is so beautiful! Wow, what a difference that makes. I’m sending to my sister who might want to try this out.
This looks fantastic! Not the type of makeover I can do in a rental apartment, but great to keep in mind for the future!
This is so cool! We have one soffit and I hate it but I think we’re going to leave it be for now. Great job on this guys!
What a GORGEOUS solution!! Now my wheels are turning to disguise our soffits…
Stunning kitchen! I was too distracted by the remodel and how nice it turned out, but good tips!
Love your kitchen! The neutral pallet is beautiful!
I ABSOLUTELY LOVE your grey/white backsplash, What brand & design is it called and what size tiles did you use? There’s a ton of different looks similar to yours but yours is by far the best one I seen!
Hi there. How much did it cost you to paint your cabinets? Did you do it yourself or hire a company? A local company (MD) just sent me a quote for $11,000 to refinish/paint my cabinets. I just want them to be white, but $11,000 feels like a lot! Thoughts?
AB, $11.000 for painting is way too much. I found company JPD Kitchen Depot
in Chicago suburbs. They gave me estimate for new kitchen for 7k for cabinets and counters. I have soffits and looking for idea of how to get rid of them before starting the project. Planning to install brand new white kitchen with quartz countertops.
Good luck.
Hi AB, I didn’t paint my cabinets, I installed a new kitchen and then customized my own soffits. In your case, I would definitely look into getting a few more quotes to compare pricing. It all depends on how big your kitchen is and how much work is involved. Your quote does seem a little high but the best thing to do is a quote comparison. Best of luck!
I painted my own cabinets and added trim to the soffits–it cost me around $500
Why didn’t you just leave the soffit up, paint them and put up molding.? It’s the same thing,
This was my question too. I am thinking I could do this to my already existing soffit.
We previously had a bulkhead that stuck out further than our cabinets. If it’s not flush with the cabinets, it;’s not going to have the same look.
I think for the time effort and end result, I will just decorate existing soffit.
Looking good. What moldings did you use? How many moldings did you combine? Do you have close up picture of the moding work?
You can use whatever type of molding you like. We used leftover 5″ baseboard molding that we turned upside down.
Looks lovley,…but working on the soffit with the cupboards filled with china and crystal and the doors still attached?
Yup, that’s the reality of living in your space and renovating at the same time. Working on the soffits did not affect our plates and cups in the cabinet at all.
You moderated my comment about admiring your work that included the polite expression of surprise that you left the doors on the cabinets and the china and crystal on the shelves while doing the work. I won’t be back at your silly site.
Hi! Love the outcome of this!!! What grey paint did you use on the island?