
Well the holidays are upon us! Are you feeling it yet?
I sure am! We are in December with only a few weeks left to go. This year, I’m in full Christmas spirit! I’m embracing the decorating, not complaining about the parking issues at the mall and I’m even planning to try new holiday recipes (<—–I know! it’s a shocker even for me).
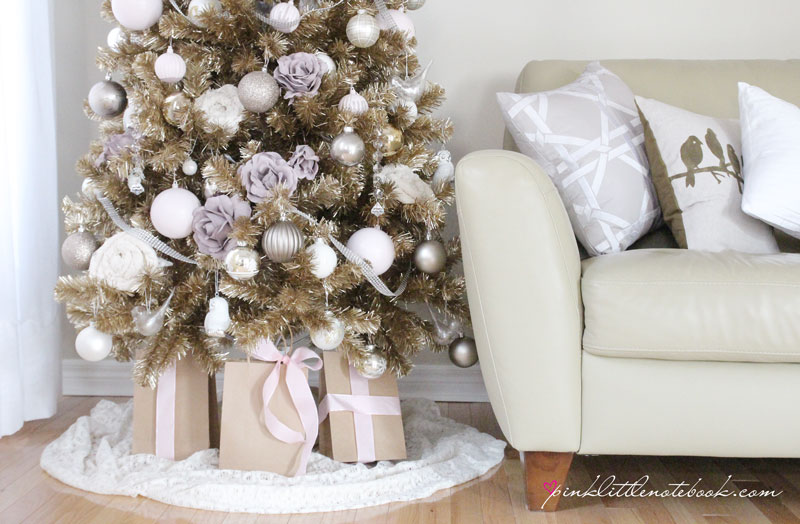
Today I’m excited to share my newly decorated Christmas tree combining my two favourite tones: pink and gold.
Feast your eyes on this!

I found this champagne colour Christmas tree last year at Urban Barn’s boxing day sale. It’s original, it’s fresh and I knew it would look great beside my sage green sofa. I had to get it!
One minor problem. When it came to decorating the tree this year, all the ornaments I own are either red, green, silver or bronze. Definitely not the look I wanted for my new tree.
So how did I get this look without buying all new ornaments?
Follow my helpful tips to make the most of what you have this holiday season!
1) Have a visual in mind. Know what you want your tree to look like.
Choose a spot in your house that showcases your tree as the main attraction. Pick a spot that works best with the width and height of your tree. Know what colours
you want to work with. If your after that pro look, choose a colour theme that compliments your current home decor. Most of all choose something that appeals to your style. Don’t forget, you will be the one looking at this display everyday during the holidays!

2) Work with what you have.
Going out to buy new ornaments every year gets expensive (unless you get those fantastic boxing day deals). Stick to neutral colour ornaments. They can be combined with any colour theme you want. If you would like to switch it up one year, it is much easier to just change out the accent colour vs all your ornaments. In my case, I had a whole bunch of red, green, silver and bronze ornaments. I definitely knew the red & green accent colours would not work in a champagne Christmas tree. So I picked out all the neutral colours in my sets and left behind all the bright colour ornaments (I’ll save them for another year!)

3) Get creative.
Once I had gathered all my neutral colour ornaments, I wanted to add an unexpected pop of pink. To achieve my customized look, I turned to Para Paints for some help.

Using some old ornaments, I painted them a pale pink (Sparkling Cuvee, PF6, Para Paints) and a grey (Spring Sage, PF40, Para Paints) using different paint techniques.


To add an usual twist, I pick up some fake roses from the Dollar Store and painted them lavender (Weathered Silk, PF9, Para Paints).

Painting your current ornaments are also a great way for people who do not want the traditional Christmas colours they sell at the store. Using Para Paints, you have an endless selection of great colour to choose from to get that one-of-a-kind Christmas ornament.
4) Put it all together.
Take your pieces and play around with it until it looks right to you. Don’t be afraid to try new things. Take an item from your house and use it in unexpected ways. To add a finishing touch to the tree, I used extra lace fabric that I had laying around the house. I make a skirt for the base, fabric flowers and . . .

a bow for the tree topper.

There is no right or wrong way to decorate a tree. Follow your inner child and have fun with it!


17 Comments
Wow Sabrina what a stunningly beautiful tree!! Love the colour choices. Just one question though….HOW ON EARTH did you paint those roses??? Genius!
Thanks so much Tash! I began painting the roses with a sponge brush but realized it’s a lot quicker to just dunk the entire rose into the can of paint and hang upside down to dry 🙂
Ahh, so smart…they turned out amazing!
Sabrina, your tree is beautiful and very elegant looking. I would have never thought to paint your existing Christmas balls/tree decorations. How did you get the Christmas balls to stand up while you painted them and how long did you have to wait for them to dry? How about a tuitorial on how to do this? Would spray paint works but I’d be afraid of drips.
Thanks for sharing this with us.
Hi Betty. Thanks so much!
For the painted xmas blubs, the best thing to do is hang them. I strung all my blubs on a thin wire that I attached from one door knob to another door knob in my office. I just sat on the floor and painted away. It’s probably better to do it in a garage or basement where you can hang it higher so you’re not on the floor. I gave them two coats and probably waited a half hour for it to dry in between. If you were to use spray paint, again, I would probably hang them and just make sure you have enough space in between so you can properly spray them with even coats.
Very pretty, Sabrina!! Love the work with what you have theme…and the result 😉
What a gorgeous tree, Sabrina!!! I love the colors you picked. I would have thought it was really intimidating to make such a pretty customized theme, but your tips really do help and make it seem a little more manageable! 🙂
Amazing! You did a wonderful job with the tree and ornaments. Just gorgeous 🙂
so beautiful. the light hues are so lovely and unexpected for this time of year!
Just gorgeous! I love how you recycled your old ornaments and the champagne tree color is amazing. Have a wonderful Christmas!!
So pretty! Painting the ornaments to suit your theme is a brilliant idea. Thanks for the tour and Merry Christmas.
Wow! I can’t believe you painted those roses. Crazy creative and beautiful! Stellar job Sabrina!
Love your tree!!
I saw a lot of those champagne trees this year and fell in love with them! Yours is gorgeous! Visiting from Jennifer Rizzo 🙂
Very clever and beautiful!
Love what you did with the lavender flowers! It’s always easy to buy something new, but I think it’s more fun to try and figure it out another way.
What a great way to use what you already have! Thank you for sharing!