
Did you get a chance to see my big reveal last week?
All the hustle and bustle to transform one room in six weeks is finally over! I can happily say I’m enjoying this newly revamped master ensuite to the fullest (even if it means staring at it from my bed).

There are a number of things I didn’t get a chance to share during my One Room Challenge series. So as promised, I want to pass on all the details to you. To avoid a super lengthy post, I will be breaking this up into a two part series.


The Vanity:
With the tile floors being completely ripped out and re-installed, this vanity had to be removed from our ensuite into our master bedroom. We made sure to place the vanity on top of cardboard boxes so it would be easy for me to give this old thang a new fresh coat of paint.
As you can see from the pictures below, as the weeks progressed so did the junk on the countertop.

For the primer, I used PARA’s SuperStick. I specifically chose this because it’s super-adherent and it helps block out dark colours. After receiving it and reading the label, I also found out it could be used as an oil to latex conversion primer which makes life 100% easier when doing these types of projects.
Why you may ask? If you’re ever unsure whether your cabinet has treated with oil or latex paint in the past, this primer covers it all. And if you never thought of this before, I guess you have never experienced peeling paint. . . latex paint over an existing oil finish is a big NO NO. I found out the hard way.
Best part about SuperStick, it doesn’t have the harsh fumes of an oil primer!

After I got over the excitement of discovering this new primer, I got to painting. I used PARA Ultra, Cabinet & Furniture paint tinted with Evening in Paris (P5219-44). I am in love with this colour and looks great under all different lighting conditions. It’s important to use paint specifically for cabinets to get that ultimate surface protection and durability. The last thing you want is your new vanity to start chipping from the daily wear and tear.

Faux Wainscoting Feature Wall:
This wall has to be one of my favourite and easiest DIYs to date. Mind you, I probably wouldn’t be saying this if our wall ended up being an awkward size and the square boxes turned out to be an uneven mess. But we lucked out with the measurements. I’m not giving exact measurements for this project just because chances are you don’t have the same dimensions but I more than happy to share my steps with you.

We created this wall using 1″ x 2″ pine wood. To make this project a breeze, cut all your pieces to size first and then assemble.
Our boxes turned out to be 16-1/2″ x 19″. Not exactly a perfect square but pretty darn close.

Here is how we tackled this wall:
1. Begin by nailing the boarder around the entire wall.
2. Grab your two middle vertical pieces and them nail down. (Step 1 and 2 will be your longest pieces of wood.)
3. Next you will need your horizontal joining pieces. I had 9 smaller cut pieces ready for placement.

So that’s the easy part.
Now you must treat the wood. I ended up using PARA SuperStick once again since one of it’s recommended uses is for “new wood”. I gave it a nice heavy coat to seal up the pine.
This next step is a tedious one. You must caulk around every single edge and joint of the squares. You want to do this so moisture doesn’t get trap back there. Also it gives it a professional finished look.
I used DAP DryDex Spackling (the same thing I used on my staircase project) since it’s paintable and it seems to last exceedingly well.
In the above picture, I caulk around the boxes before I started painting. However, I did not caulk the entire outer boarder untill the very end. Can you see the difference?
Paint:

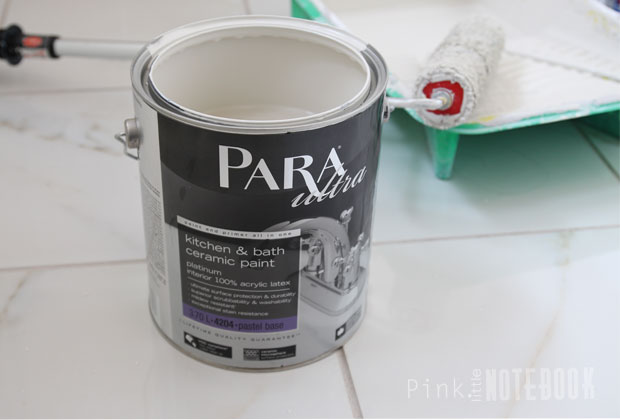
I used PARA’s Kitchen + Bath paint (4200) on all the walls. Remember it’s always important to use a special paint formula for these kinds of spaces. It provides for a harder finish that is also moisture resistant.
I decided to make my feature wall stand out by using a different colour than the other three walls. I used PARA Paints, Whitewash White (P2089-00). This was also used on all my trim.
The remaining walls, were given two coats of PARA Paints, Lunch at Tiffany’s (P5219-24). Don’t you just love this name? It’s the perfect neutral tone for this space.
Of course, if you painting an entire bathroom, it’s only right to freshen up the ceiling with a new coat. I used PARA Paints, flat ceiling white (976).


As much as I want to skip this step sometimes, I tape absolutely everything in sight! The extra 20 mintues of taping can either make or break your painting job. I always say, “crisp straight lines is perfection at its best!”

Mirror:
Again this was another simple DIY. I use the 1″ x 2″ pine wood from our feature wall to create this frame around our existing builder’s grade mirror.
Once we cut out the exact measurements for this frame, you literally just nail it to the wall creating a “boxed” look around the mirror which I think is very contemporary looking. So much easier than this other frame we created for our guest bathroom.

We were unable to put a piece of wood at the bottom of this mirror due to the countertop height. However, if you want the completed frame look, it just a matter of raising the mirror up another inch or so.

So I think I will stop here for today! I told you it’s going to be long!
See you tomorrow with the rest of the post talking about tile paint.
Until then. . .

Disclosure: I have been selected to be a part of the 2014 PARA Blog Crew. I am provided with PARA Paint products for specific DIY projects. All creativity, opinions and comments are entirely my own.


11 Comments
I love seeing the ‘how to’ steps to the finished project, along with the before and afters. Bravo on a beautiful bathroom!
I SO needed to see this. I was just trying to figure out how I was going to get my cabinets to match the new molding my husband wants in our bathroom. He wants to change from the gloss white trim to a darker wood trim and I had no idea what I was going to do… now I do 🙂
This is so pretty. I’ve been wanting to update my bathrooms. I love the whites
You have a nice vision for your bathroom. Will not be surprised if you have an absolutely stunning end result. I could learn from your posts, but I’d still need the gumption.
Your revamp came out totally gorg. There is just something about all white I just love.
What a beautful job you did! It looks a bathroom that you would find in a spa!! I love the fresh clean lines!
THIS looks amazing!! Please come decorate my house! I am obsessed with this!
My favorite part is the DIY wainscoting wall! Everything looks so beautiful!
I love the boxed frame on the mirror. I never would have thought to do this. So much more sophisticated.
I did the mirror frame on the wall also and it made a HUGE difference in our bathroom too (along with updating the lighting). I also had the problem of not enough room on bottom and I actually used Liquid Nails for Mirrors to attach it. I had a tiny gap afterwards along the mirror side edge and I caulked it (in my case, the mirror frame was light beige).
Congrats on a great job.
Does look lovely, but with all that renovation you never thought to change the location of your toilet roll holder?