
Creating this built-in closet system is one of the best projects we’ve completed. It’s such a satisfying feeling to see a space that was once dark and disorganized turn into something that feels like a personal boutique. I really can’t wait to share the final reveal with you!
If you’re looking at this project and thinking “there is no shot I can make something like this”. Let me tell you, we’re no experts either. We only have two DIY carpentry projects under our belt, our built-in living room bookshelves and our kitchen built-in bench. That’s it!
If you’re a newbie at these types of projects (like us), start with something small to get a feel for it. Once you create one project, you will definitely have the confidence to tackle bigger things. The time and energy is so worth it!

Our closet system is built very similar to the one in this Bob Villa video. Of course, I tweaked many details to make it work for our space but the overall construction of the fitted boxes is pretty much the same. I don’t recommend cutting all your pieces in advance for one specific reason—the floors and walls are never levelled. This will throw off some of the dimensions slightly and you’ll need to adjust accordingly. The only pieces we pre-cut were all the vertical panels.
Cost of Materials
4′ x 8′ Finished Plywood Boards – $409.16
Paint – $161.16
Miscellaneous – $57.57
(screws, nails, brackets, caulking, etc.)
Drawers/Hardware – $162.64
Closet Rods/Hardware – $205.92
Quartz Countertop – $0 (re-using an old piece)
TOTAL: $996.45
If your hiring a professional, the average closet usually begins around the $2,300-$3,500 mark. Keep in mind this will only get you melamine in a closet space smaller than ours. For a closet space our size and with the materials we used, the price range can be anywhere from $8,000-$15,000.

I started by measuring out our closet space, planning out where we want our shelves and hanging rods to be. You can see all my design plans and dimensions in this post.
The back wall is our starting point. This section is designed for long garments and seasonal jackets. It’s also the only compartment that has a 20″ depth. The hangers need to be able to sit inside this fitted box completely as the right corner will be a covered section.
Since I’m not a fan of melamine or particle board, we are using 1/2″ thick plywood, we put extra pieces of wood against the wall and in between all panels to bulk it up. This creates the illusion of thick side panels, and those gaps are going to be covered by edging later. Anything that we secure to the wall is drilled directly into a wall joist. Use a stud finder ALWAYS!
If you want thick side panels and want to avoid this extra step, you can just buy thicker wood (3/4″) but be aware there is a big price difference. Expect the cost of wood to double in price.

As we begin on the next wall, this compartment is made for our double rods. We secure the two new vertical panel against the existing panel and base (marked as #1 in the above image). Then we put the horizontal cleats running across the back wall, one at the base (we removed the baseboards) and one just below the ceiling (see #2). Again, make sure the cleats are secured into the joist. The middle cleat is added to create a shelf, we use it as support since it’s there but not needed otherwise.
To create the box shape, you’ll want to grab your other vertical panel (#3) and place it against the cleats on the opposite side where you will fasten them together. To finish off the box, grab another two horizontal cleats and attach it to the front side of the top and bottom (mimicking the back wall).

The structure will feel flimsy at first but as you move along and make all the connections, you will start to see how sturdy and heavy duty these built-ins are going to be.
We did this same procedure to the remaining wall, which creates three fitted boxes in our space.
In the bottom platforms we included extra support, which is a bit of overkill. However, we know our daughter will be sitting/standing/playing on these areas. Better to be safe than sorry.

We had many challenges within this space, including the vent and windows. For the vent, we simply extend the duct work up and let it vent out from the top of the platform. There was not enough height in the platforms to vent out from the front base.
As for the window, we had no choice but to build in front of it. Typically, closet systems/built-ins have a 23″- 24″ depth. Our closet depth is 15″. Our hangers will stick out slightly, however, only 15″ of our window is covered.
To make this less noticeable, I incorporated drapes into my design plan. We left about a 4″ gap from the window to the start of the vertical panel. This allows us to install drapes that will go directly between the structure. It’s a great trick to camouflage where the window begins and ends.

Once the framing is all complete, this is where the real magic starts happening. We went back and added all the wood edging, shelves and platforms. Using our plywood sheets, we cut everything to size with a table saw and fastened it in place with a nail gun.

On the other side of our closet, we created a shoe shelf and dresser area. We had yet another challenge with the attic door. The clearance from the wall to the attic door is 12″. In order to make this work, we built the top section to fit 12″ shelves and transitioned the bottom to 15″, which will fit the depth of our drawers.
We are going to be using a stone countertop right above the drawers but in this post, you will not see the finish product. We left out the countertop and drawers to make painting easier.

Be sure to fill in all the screw and nail holes before priming the wood. The very best wood primer to use is this one. Shellac primer fills in all the wood grains and gives a nice smooth finish. However, the negative is that it smells so BAD. The smell lasted a few days as this space does not have any ventilation.
Once the primer dries, I gave it a light sanding and used two coats of Benjamin Moore standard white. This closet has the smoothest finish ever. You can’t see the wood grains at all.

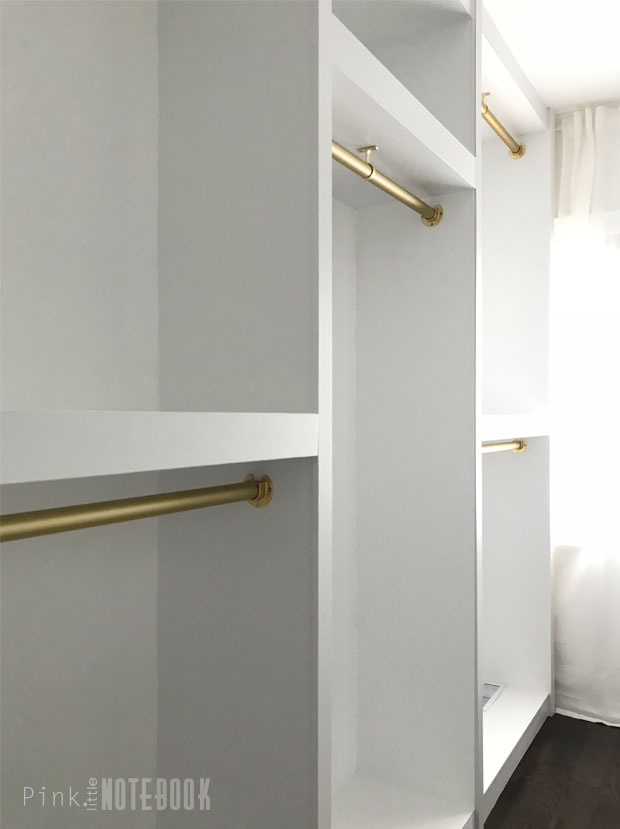
The gold heavy-duty rods are the perfect finishing touch. You should consider using support brackets if your rods are 40″ or longer. I can’t even tell you how many times I’ve seen drooping closet rods when I was searching for inspiration pictures. For my closet build, I only had one rod over 40″, however, I’ve put support brackets everywhere. I’m building this closet to stand the test of time!

This project has been rewarding in so many ways. A few more finishing touches and I can’t wait to share the finished walk-in closet. If you have any questions on the build, please be sure to ask!

Click through these links to see more from our master closet series:
Designing my walk-in closet
5 Things to know before revamping your walk-in closet
Installing our built-in closet system (with pricing)
My DIY Master Walk-In Closet Reveal
DIY Jewellery Organizer Drawer Insert


41 Comments
This is so impressive! I look forward to the final reveal.
Thanks so much Cyndi! I can’t wait to share!
The gold rods are fabulous! Where did you order?
Try Amazon, they carry some.
This is absolutely gorgeous wow . You both did an amazing job. I’m in the works of building my walk-in and u have given me so much inspiration and tip thank u so much. May I ask where did u purchase your gold rods from? im inlove with them
I love how this turned out! I would have never guessed it was DIY! Great job! I want to do this in our closet!
Thanks for the awesome compliment! 🙂
Hi Sabrina,
Could you provide the cuts measurements?
I love this design! I seriously need to redesign our closet, but that probably won’t happen!
Wow- this turned out great! And such a helpful tutorial. I live in an apartment right now so I can’t really make modifications, but love everything you did!
xoxo A
wwwsouthernbelleintraining.com
This is AMAZING! Seriously. Dream closet!
SAbrina, this is a wonderful description of exactly what you did to achieve fantastic results. I am improssed by how substantial it looks, and the fantastic finish. Thanks for the shellac primer tip. Great job, looking forward to the big reveal and hope you and your husband toast each other in the new closet,with champagne because it is looking very champagne-worthy!
Thanks so much for your kind comment Bonnie! We are pretty excited about our new walk-in. It turned out better than we could imagine!
Great useful and thorough article! Thank you, Sabrina!
ahhh. now that’s very cleverly done. looks superb
I love the gold hardware! May I ask where it’s from?
Looks amazing!!! Where are your rods from?
Hi Liz, They are from Richelieu Hardware
Thank you!
Loving your closet and I’m attempting mine as we speak. Was the wood edging that you used just strips of plywood cut to the width of the gap from when you bulked up the plywood? And for the cleats, did you use the 1/2″ plywood as well (just cut in to the strip sizes)? Just wondering if you used only 1/2″ plywood for everything or if you used other types and sizes of wood.
xoxo
Victoria – http://www.vpofstyle.com
Looks like she used strips of lumber instead of plywood for edging. I think that’s a great solution. Instantly covers up plywood edges abs you can fill in the seam with putty. I am frugal so went with melamine. But will do this for a more permanent solution.
Love this! It’s a beautiful custom closet. Great job.
How did you build the drawers?
Love your closet! Can you tell me which drawers you used?
Curious how you fastened the edging? Was it with wood glue and nails on the top and bottom?
Just wondering where you got the gold rods.
Where did you get the gold rods from?
That’s what I was going to ask.
Hi, I love your closet remodel! It inspired me to do my own!Have just measured out my own closet and getting ready to move everything out in the morning. So excited to get started, I’ve wanted this for so long. I have a question,,,as far as the drawers, did you build the shelves wide enough to accommodate the sliders? Or did you just buy the size nearest to your measurements taken already. It’s the only thing I’m having a little trouble visualizing.
Thank you!
Thank you so much for posting your closet reno. It encouraged my hubby and I to do our own. We really looked at the details in your photos as inspiration for ourselves. We are NOT builders at all. This project was a major marriage success. It was not easy but we made it through and so happy with the outcome. Thank you again so much.
Hello! How is your paint choice holding up? I’m ready to paint my closet and trying to decide the best route to go.
Looks so professional! You guys do amazing work!
You’ve given me the courage to start my own project! I just wanted to thank you for posting your “journey” with this. It truly did give the scope of what to do! Many thanks! I’ll look forward to seeing your other posts!
Sabrina, thank you so much for sharing!! this is very impressive. Do you recall where you purchased the brackets and rods?
Did you brush paint the wood or spray?!
Looks flawless
This is a very useful and thorough article! It’s exactly what we need for our closet! Thank you, Sabrina!
Hello, thanks for the awesome post. I know I’m a little late to the party, but glad I found it. I’m building up the nerve to tackle my closet now and would like to know what you used for the cleats and the edging.
What is the material of the rod you have used? is it available in silver color? From where did you buy this? Please let me know. By the way, you have elaborately described all things including the estimated cost. Thanks.
What primer have you used? The link does not work.
Just what I need. I am turning a very small bedroom into a closet.
I’m wondering if you have problems accessing things on what you referred to as wall A in your drawing? I have a very similar layout and am not sure what to do with that corner.