
Looking back at what we’ve completed in the last year at the Mod House Project, there’s really only one thing I regret not doing from the very beginning.
And that’s removing our popcorn ceilings.
Last October when we began demolition on our home, we had such a major to-do list and an urge to quickly move in that we sort of turned a blind eye to something that we would have loved to do under normal circumstances.
Living in our space now and looking at those ceilings, I have to admit, it kinda drives me nuts. As we slowly begin tackling our next project which is decorating our family room, I thought this would be the perfect opportunity to start smoothing out those ceilings.
Let’s bring you up to speed on this space so far.
The below image is from our MLS listing. The previous owner had bulky over-sized furniture, no overhead lighting and popcorn ceilings that just added to the dated look.

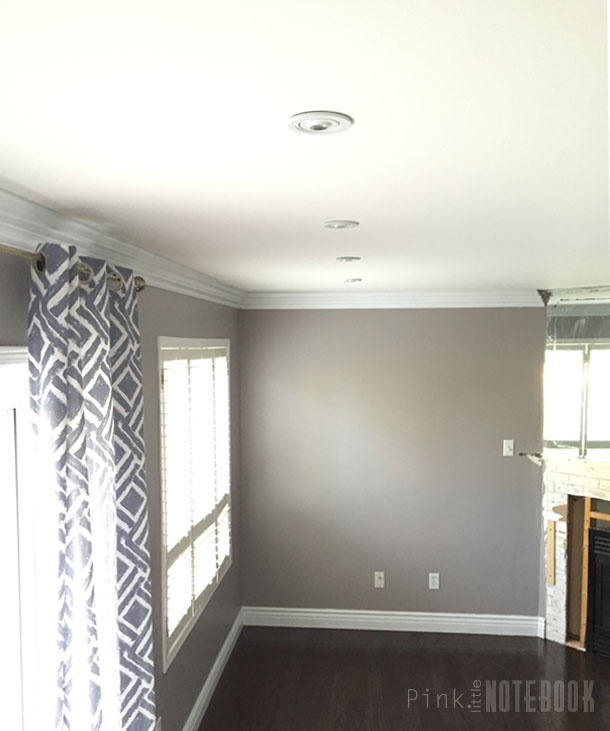
When we moved in, you can see the progress we’ve made.

We laid new flooring to match the rest of the main floor for a cohesive look, added overhead lighting, installed crown molding and painted.

Personally, I was never a fan of seeing pot lights in a popcorn ceiling. It looks awkward to me and for the past year that’s all I’ve been staring at…well that and the corner fireplace that needs some major TLC (but I’ll save that for another post).
After finalizing a plan for the family room, I thought the first thing we needed to do was say good bye to all the ugliness up top. And just like that we removed the textured ceilings. Best thing ever!

It was a fast and fairly easy process due to the fact that our ceiling have never been painted before. We also lucked out because the drywall underneath was in great shape and minimal patching work was required.
I won’t do a full step-by-step tutorial because there’s a ton of them online if you search. But also because I could explain in two sentences, what needs to be done:
“spray water directly on popcorn ceiling, let it soak for 30 seconds and scrape. Patch any imperfections and paint”.
It’s really a no brainer and you can’t really mess it up unless you start gouging the crap out of your ceiling with a scraper or you jump into the project without knowing what’s on your ceiling first.
So here’s a few pointers we’ve learned along the way.
- If you have an older home (30 years +), do check for asbestos before attempting to remove your own popcorn ceiling. Back in the day, asbestos was commonly used in ceiling textures. It was banned in Canada and U.S. in 1978, however, it remained in stock for years after that until remaining product was eventually sold off and inventory was depleted.
- You don’t need any fancy spray machines or fancy tools to remove a popcorn ceiling, a simple spray bottle filled with warm water and a paint scraper works just fine (unless of course, you have a ceiling that has been painted so many times, you may need a chemical stripper instead of water)
- Tape your scraper to a long poll, it’s easier on your arms and body.
- Invest in a great ceiling paint with a matt finish. Anything with a shine or gloss will show every imperfection.
- Use plastic drop cloths from the dollar store to cover floors and walls. It’s a quick and easy clean up. There is very minimal dust since everything is wet and literally falls straight down to the floor. However, if you’re a neat freak like my husband then you may want to cover every square inch of the space (just incase!). . .

And there you have it, a smooth ceiling and it only cost us a gallon of ceiling paint!

UPDATE: You can check out the full family room reveal here.


13 Comments
Great helpful info! I appreciate the helpful pointers, especially.
OMG it looks SO GOOD! Why were popcorn ceilings ever a thing? Ughhhhh the worst idea ever!
I couldn’t agree more!! Definitely a bad invention. Thanks for stopping by 🙂
This is great! The hubs has been wanting to remove our popcorn ceilings for awhile now and my parents as well in their home. I will make sure to pass along your tips. I had no idea it was this easy! More incentive for me to get his ass moving on the ceiling! LOL
Hi Amy!! Smooth ceilings make all the difference! Totally worth the effort 🙂
Wow! There isn’t even a single piece of furniture, but already the before and after shots are so dramatic! I’ve been in the process of removing our popcorn ceilings…for awhile. Just need to finish the bedrooms now. And then, of course refinish the ceilings 😀 Nice job—huge improvement!
Thanks so much Brooke!
I really want to do this, but my ceiling is concrete under the popcorn and I have no idea if it would look good
Hi Casey!! I’m not entirely sure what the concrete would look like but I assume the patching job would be a little more intense than drywall. It’s worth looking into 🙂 Thanks for stopping by!
First off, this is my first time on your blog and what a great layout! The before and after pics are great, and I love the flooring. I’m pinning this because who knows what our house will look like when we finally buy, but just in case I’ll know where to go!
I agree with you that removing popcorn ceilings is such an important part of updating a home. Thanks for the tip of attaching the scraper to a stick. I spent a lot of time going up and down the ladder when I scraped the ceiling in our bedroom. I also didn’t cover the floor, and scraping the little bits of plaster out of the grooves in the hardwood was not fun. Lessons learned. I have essentially three ceilings to go, and honestly I’ve considered getting quotes to hire them out. The scraper on a stick might make me reconsider.
Did you have to apply a texture to the ceiling after the popcorn was removed and before you painted? (Such as orange peel…) they look great!
Nope! Surprising our drywall ceiling were in great shape underneath all that stucco. We had to patch the odd nail hole but that’s about it.