
I’ve got a powder room update for you all!! I’m so psyched about my new dramatic space that I can hardly contain my excitement. . . that or maybe it’s because I’m one step closer to almost completing another room at the Mod House Project! *happy dance*
Unfortunately, the most challenging thing about this tiny powder room is taking pictures, so please deal with my close ups and one angle shots. I’m seriously not equipped nor skilled enough to deal with the mechanics of shooting directly at a sunny window. It’s tough stuff but I’m working on finding a better solution for the final reveal.
Today, I wanted to share a simple DIY that we created using leftover shoe mold trim.
Before I go any further, let me answer that question you might have lingering in your head: “what is shoe mold trim?” I really had no clue either when I first heard the term but it basically does the same job as a quarter round. It just looks different.
Now if you never installed flooring before, you’re probably not familiar with the name of either trim but just take a look at my image below and it will all make sense to you!
Quarter rounds and shoe molds are a type of trim often used to add aesthetic dimension to your baseboards and it also doubles as a cover for expansion gaps where your floor and wall meet.

There’s a ton of different styles when it comes to quarter rounds and shoe molds. The main difference to note between the two is that the shoe mold has a broad vertical surface which looks a lot sleeker than the traditional quarter round.
So here’s the background story about how we came across extra shoe molding. When we installed our floors on our second level, we planned to keep the baseboards but had to rip out all the quarter rounds to remove the carpet. When it came to purchasing news quarter rounds, I learned about the shoe mold profile and instead opted for this choice. Well I must have been under the weather that day because I TOTALLY miscalculated the trim we needed to complete the second floor. After everything was all said and done, we had so much shoe molding left over, I was dumbfounded.
Since I absolutely hate letting things go to waste, I needed to find some alternative uses for this shoe mold trim. As the renovations went along, I had no trouble fitting it into our projects around the house.
For instance, in our kitchen we used some of the trim to create a custom DIY valance to hide our pipe work above the cabinets.
(psst. . . I will post a tutorial for this soon)

In the powder room we are using the remaining pieces to create these awesome wall frames.

In retrospect, this extra trim actually came in super handy for some of our finishing touches. It just goes to show you that leftover material could be used in creative ways and incorporated in other parts of your home!
Now if you’ve been thinking about creating your own wall details, I prepared a light tutorial today on how we built our wall frames to mimic the look of panels.
Step one: Layout a design
The hubby and I usually have different methods when it comes to figuring out dimensions for a layout.
His approach—figure out the measurements by marking up the walls with pencil.
My approach—start with a pen and paper draft.
Since he is not here to defend his method, I say my way is much easier 😉 I simply draw out the dimensions of my wall and figure out the following two things:
a) the distance between the frames (in this case, I thought 4″ and 6″ worked well. See diagram below); and
b) how many frames I want on the walls (2 vertical and 2 horizontal).
From there, I’m pretty much able to figure out my frame sizes.
These are the measurements we ended up working with:

EXAMPLE: width of wall (65″) – spacing on left (6″) – spacing in the middle (6″) – spacing on right (6″) = left over space (47″) / number of frames horizontally (2) = width of frame (23.5″)
Of course, I had to recalculate my frame sizes for the smaller wall but I kept all the space between the frames the same (4″ and 6″). Once I have everything all figured out on paper, I then use painters tape to mock-up a sample in the actual space. I do this to make sure I have visual of the frame size and that I’m happy with the positioning on the wall.
Step Two: Make your cuts
Take your newfound measurements and start cutting your pieces. Ensure that all pieces are cut to exact lengths with the required miter cuts.
If you’re not use to making miter cuts, practice on scrap pieces first. I personally find miter cuts to be tricky and nothing is more upsetting than wasting material on stupid mistakes (I obviously know this first hand!)
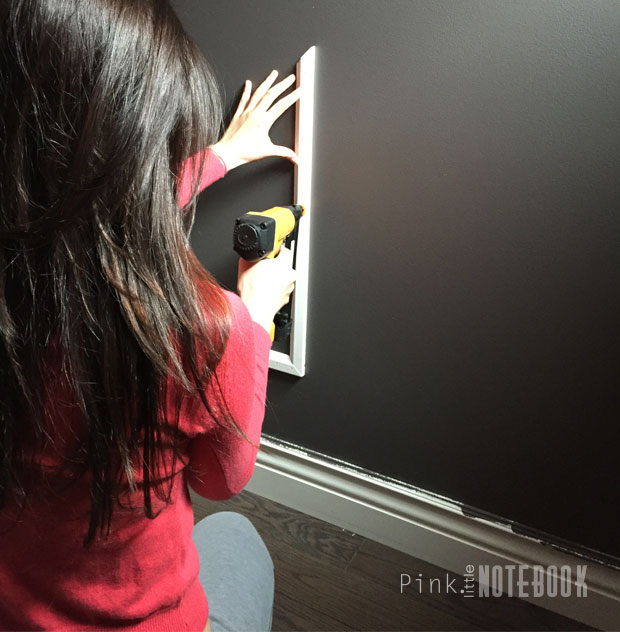
Step Three: Level and nail your trim

Use a level, ALWAYS!
Don’t rely on your eye to make sure a piece is perfectly straight. You’ll kick yourself when you step back or when your miter saw cuts don’t line up.
The hubby positioned the first piece of trim at the correct height (6″ above baseboard and 6″ away from the wall) and used a level to make sure it was straight. As he held it in place, I used the nail gun to secure it.
Once you have the first piece of the trim nailed and leveled, finishing the remainder of the frame is a breeze.

Step four: Fill and paint
Now that everything is nailed in place, you need to fill each hole you just made. I used DAP filler but any sort of wood filler will do. Just apply directly with your finger.
I also go the extra mile and fill in my miter cuts as well. Nothing beats a seamless frame!
Once everything is dry, you’re able to sand it all down and paint your trim.


Ta-da! And you’re done! What do you think?

Oh and for all those still wondering, I haven’t decided what colour I’m going to paint the baseboards yet. It’s going to be a surprise for you (. . . and I)!
See full powder room reveal here!


27 Comments
I much prefer the shoe molding to quarter round. Plus, it’s so much more versatile. Think of how stuck you’d have been if you’d done the same over calculation with quarter round. It just wouldn’t look the same in the powder room!
So true Julia! Quarter rounds would have been a bit harder to incorporate in other parts of the house. Thank goodness for that 😉
Love it!
Thanks Meredith!!
It’s almost as if you subconsciously planned the whole thing, Sabrina 😉 That power room is drool-worthy! Can’t wait to see what color you choose for the baseboards!
Thanks Rachel! I’m just happy we can use up the extra stock sitting in the basement. It’s a great feeling to free up some space down there 😉
Love how it turned out. So simple too but gives it a really elegant touch
I would love to learn how to do this. What kind of miter saw and nail gun do you use. Would be good for so many projects! Thanks!
Hi Gail,
We used our Ryobi mitre saw to make our cuts and a Bostitch nail gun to secure the molding on the wall. Thanks for stopping by!
Sabrina,
It looks like you are using a small nail gun. What brand are you using? I need to buy one but looking for something simple. Also, did you only nail to the wall (trim) or did you nail and glue to the wall. Thanks so much for your help. Everything looks beautiful!
Hi Tammy,
We are using a Bostitch nail gun that we hook up into our compressor. It works very well for the small projects we complete in our home. We only nailed the trim to the wall. I find glue can get messy if it leaks out.
Thanks for stopping by 🙂
That is just beautiful! Gives it a totally different look-more interesting
I definitely agree Colleen! ‘It’s all in the details” as they say. Thanks for the kind words:)
Hi Sabrina,
Comment on an old post I know. Just find your blog from I think Elle Decor. Lots of good stuff here!
Curious about the baseboard shown in the photo on the difference between quarter round and shoe trim. How tall is that baseboard? Is it 5″ or taller? And how tall is the shoe trim?
We installed 5″ in the place we just sold. I’m considering installing something bit taller in our new place and also installing something like the shoe trim as you have done. The room is much larger (area wise but not greatly taller) so it seems the room will visually support a taller baseboard.
Thank you for explaining shoe molding….I hate quarter round–looks cheap but the shoe molding looks great!
Hi there,
Trying to do something very similar all by myself. Have to buy the nail gun and nails. Any recommendations as far as sizing?
Thank you,
Chris
Hi Chris, we used a Bostitch nail gun with 25mm staples which worked great for us. Hope this helps!
Could you tell me where you got the shoe molding? It’s lovely and I want to use something similar in my house but am having trouble locating it! Many thanks in advance!
I was finally able to find something similar labeled “window stop”. Very nice look!
where did you purchase the shoe moulding? we have it in our house and are renovating an addition. i would like to have consistency by using shoe instead of quarter round.
Hi Connie, You can buy shoe mould from any moulding or hardware store. If you live in the Greater Toronto area, send me an email and I will give you the location of store I bought it from.
Where did you find the shoe molding? All I can find is the quarter round which I’m not really a fan of. Thanks!
Hi Amanda, I went to a speciality molding store.
It looks beautiful! Planning our powder room update and this is such an inspiration. I currently have textured walls. Did you skim your walls first or were they already smooth? Thinking they have to be smooth to achieve the overall look of paneling with only doing the trim molding.
Also- forgot to ask- did you use the same sheen for your molding, trim, and ceiling paint? I usually use matte paint for my walls and a gloss paint for my trim but not sure about it for a space like this that is all one color….
Hey Sabrina!
That is beautiful! Thanks for sharing how to decorate your room walls with molding. Keep up the great work!