
As you may recall from last week’s garage makeover reveal, hubby Mike, finally got his dream come true—a neat, clean and organized garage space. Although I couldn’t understand his obsession with wanting to finish our garage, I finally “got it” once it was complete!

One of the biggest improvements to this space was our newly painted floors. Talk about BIG impact! Every time I come home, I seriously feel like I’m driving into a showroom. These floors totally went above and beyond my expectations. https://www.lasiksandiegoeye.com/lasik-surgery-information/valtrex-over-the-counter.html

We used RockSolid Polycuramine Garage Floor Coating System which is the ultimate DIY kit for those wanting to tackle this project on their own. In case you’re wondering what Polycuramine is, it’s a special formula created by RockSolid that combines the best benefits of Polyurea, Urethane and Epoxy to create an indestructible, self-leveling, flexible, fast curing, high gloss coating system. Also suppose to be 20x stronger than epoxy paint! https://roanokeoralsurgery.com/buy-retin-a-cream-online/


As you can see, our concrete floors were not in the best of shape. They are about 20 years old, full of old stains, rust and dirt. To further add to the mess, the hubby decided to spray paint our peg board that we used in our garage directly on the floor so this RockSolid Coating System really did have a lot of covering up to do. https://roanokeoralsurgery.com/zithromax-online/

Our garage is roughly 400 sq. ft. in total. Each box covers 250 sq. ft., so we ended up using two boxes of RockSolid Garage Coat and one box of RockSolid Clear Top Coat.

So what’s include:
- Citric-Etch Solution https://roanokeoralsurgery.com/zovirax-over-the-counter/
- Foam Roller https://sleepapneasurgerynyc.com/blog/viagra-online
- Garage Coat Pouch https://sleepapneasurgerynyc.com/blog/buy-flagyl-over-the-counter
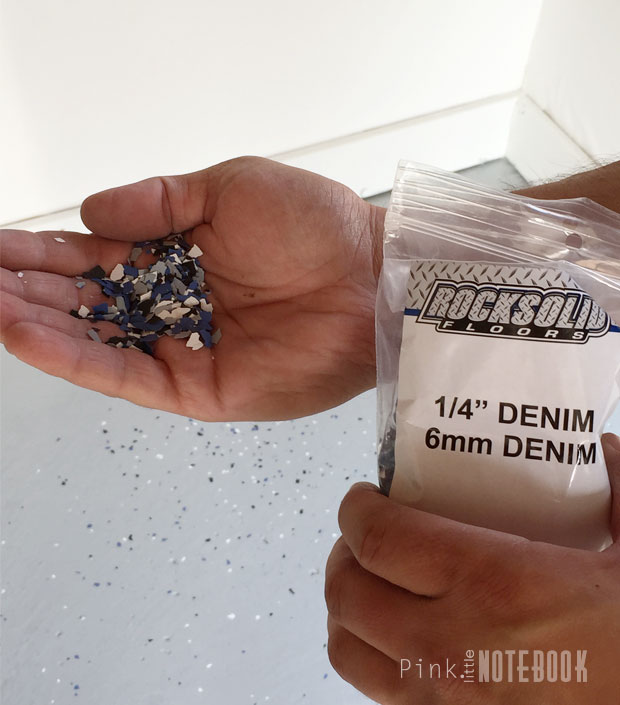
- Decorative Chips
Other Supplies Need:
- 24 cm (9.5″) Roller Frame with Extension Handle
- 8 cm (3″) Disposable Paint Brush
- Disposable Paint Pan
- Stiff-bristled Broom
- Garden Hose with Spray Nozzle
- Blue Masking Tape or Duck Tape
- Safety Equipment (mask, gloves, safety glasses, etc.)
Concrete Preparation:
To open the pours and clean the concrete, Mike began by mixing the supplied RockSolid Citric Etch Solution with water. He applied the product to the garage floor in small sections scrubbing the solution with a bristle broom. He started cleaning before I had the chance to run out with my camera to take pictures or even witness the process but he said the solution created a sizzling sound. Almost like he can hear it chemically cleaning the floors. To remove the solution, he rinsed the floors with water while still scrubbing.
To double check that the surface is clean, apply a mist of water to the surface of your floor. If all is good, the water should evenly accept across the surface. If the water beads, it means there is still possible contamination (such as oil, wax or tire dressing) in which case, you need to continue scrubbing the floors. We let our floors dry overnight.
Paint Application:

The paint comes in this cool soft packaging known as a burst pack that is marked “Side A” and “Side B”. In order to activate the paint, the individual chemicals from Side A need to be rolled into Side B while you have it on a flat surface, sort of like rolling a toothpaste tube. The centre seam then opens up and allows the two sides to mix. Once that happens, you grab the bag and shake it like crazy making sure everything is completely combined. We opened the contents and dumped the paint into a rolling pan (as the boys found this easier to share the paint). However, the instructions do advise you to pour the mixed material directly on floor. If you choose the pouring method, you start about a foot from the back corner wall in 4′-5′ ribbons and continue doing it this way until you reach the end of the garage.
We happened to paint the garage floors during one of the hottest days which does affect the pot life. Normally you have one hour to paint after you combine the two components before it starts hardening. Because of the extreme heat conditions, we had less than that to get paint on the floor.


We began cutting the perimeter of the garage with a paint brush and used the foam roller to apply to the rest of the floor. They suggest using an “M & W” pattern to keep the coats of paint even and uniformed across the surface. We completed small sections at time (4’x4′ strips) and then stopped to apply RockSolid Decorative Chips.

At first, my husband was throwing the chips very scarcely. I sort of went back over what he did and dispensed the chips like I was throwing confetti. They supply you with enough chips to cover the surface and the more evenly spread out, the better it looks.

A few things I should probably note—I sort of assumed that the Polycuramine paint would be thick. I was hoping that it would seal any minor cracks on the garage floor. FYI I assumed wronged. The paint is probably the same consistency of latex paint so it really didn’t fill any cracks in the concrete. Overall, it’s really not that obvious because of the decorative chips but I know it’s there. So if you want a flawless finish, seal the cracks beforehand (I do believe they sell a product for it).
Secondly, we did want to paint the concrete sides in the garage, however, we were unsure whether or not we had enough paint. In the end, it turns out we did have enough but at that point, it was too late. You can’t go back and walk on the wet floors. So make sure if you want to include the sides of your garage or even your stairs, that you calculate it in your total square footage. As an after thought, we just went back to paint the sides white to blend with the walls.

Last but not least, you should tape off the end of your garage where your garage doors meet the concrete. This paint should not be on the exterior of your garage or exposed to weather conditions. We used duck tape to create the straight edge which worked for the most part but we got some bleeding in some areas once we took it off. They advise to use painters tape but I’m not quite sure it’s heavy duty enough to adhere to concrete floors.

Cure Time:
The recommended cure time is 8-10 hours for foot traffic and 24 hours for vehicle traffic. Due to our high temperature that day, the paint dried pretty quickly for us. To be honest, it almost looked like it was sealed already due it’s high gloss finish. However, we still had plans to seal the floors and waited about two days before we proceeded with the next step.

Clear Top Coat:
This top coat is very easy to work with. Again it only has an hour of pot life so you do have to work quickly with it. Using the burst packaging, you roll Side A towards Side B and shake. We used a rolling pan and brush to apply.

By the end, I became obsessive and slightly anal about the decorative chips. I noticed when everything dried (after our first coat) that I wanted to add a few more chips to some places where I thought could use more. So as the hubby rolled the clear coat, I sprinkled a few chips in a couple of corners where it needed fixing. This is probably not the ideal time to do it but for the most part it worked! It dried perfectly and I really can’t tell the difference.


We are super happy with the results and look forward to seeing how well this product stands up to all its high expectations!!

Disclosure: I received samples of Rust-Oleum’s RockSolid Floors® Polycuramine Coating System for review purposes only. The views and opinions expressed in this post are 100% my own and based on my experience using this product.


30 Comments
Sabrina, the garage looks ah-MAZ-ing! Thank you for the info about the crack and the side walls. Absolutely gorgeous. I’m betting one could add your own decorative chips as long as they are flat. 🙂 Leaves the door open to designing on the floor. 🙂 It looks like a lot of work paid off in a designer garage. Yay! Enjoy!!!
Hi Christina! I never thought about using your own decorative chips, you’re absolutely right though. . . it does leave the door open to adding your own personal touch! Thanks so much for stopping by 🙂
The Rust-Oleum chips are made to sort of absorb into the rocksolid. Other kinds of chips may not work? Worth checking into..
Hey Christina,
I’m about to try this. I bought a couple containers of silvery mica chips to mix in with what rust oleum provides in the 2.5 car garage Rocksolid kit. I’ll try to post the after pics.
Wow! That looks amazing! I would love someone to do this to my garage!
Thanks so much Sara! It’s definitely worth it 🙂
It looks great!! I would be picky about the chips too!!
I was a crazy lady with the decorative chips. The perfectionist in me couldn’t stop tossing them around the floor. lol. Thanks for stopping by Ashley!
We have wanted to do this for the longest time! But, we get intimidated. It seems like such a hairy project. Yours came out so great! I guess it’s time for us to clean out our garage and tackle this project!
Hi Crystal, it’s definitely a satisfying project to complete! If you’re a champ at painting a wall, this will be a walk in the park. Not difficult to do at all. It’s the cleaning and organizing of all the things in our garage that is the actual hard part 🙂
Tks
Hi Crystal, I was perusing your blog (it’s awesome btw) and came upon the garage floor makeover. I agree with everyone’s post that your floor turned out great! I was wondering if this product can be used in a basement. We have cement floors in our laundry/utility room and they drive me crazy! Thanks for the post and your input.
Hi Patti,
I did exhaustive reading on this product, and it does appear that you can use for any concrete, interior floor or floor that protected from us rays. Not recommend for long sun exposure.
Sabrina my wife and I have really thought about it and we would like to do our living room and something like that could you recommend we heard about Rock Solid we seen the commercial where the floor was a really beautiful blue or orange or look like a marble gray would you recommend us doing that to the living room that’s what we really want to do we’re in our 50s and we really like that idea you think it would work out
Hi Ric and Sue!
In regards to you question, I would say it all depends on your preference. I personally like hardwood for a living room just because it adds warmth to a space. However, if you like the look of concrete paint, go for it. Just keep in mind this paint only works on concrete floors and also the finish is extremely shiny, almost mirror-like.
It has been about 9 months since you completed the project. How is the garage floor holding up?
Hi Al, the garage floor held up amazingly! We went through our first winter with our vehicles going in and out daily and they still look exactly the same as the day we painted them. All we had to do was a quick wash down in the Spring to remove all the dirt/salt from the winter.
I just applied RockSolid to my garage yesterday and it looks great, I can just walk on now, but no cars yet. I’m trying to decide if I should use Clear Coat or not. And if I did, how much would I need? It took 4 boxes for the Coating.
Hi Terry, I would definitely use the clear coat to seal it all in. I used two boxes to coat my garage and only one box of clear coat.
You probably need at least 2 boxes. Pick up a third just in case (you can always return unopened). My garage took just under 2 boxes of coating and 1.5 boxes of clear coat. We used the Polycuramine product (not the epoxy). I completed it in June. It looks fantastic!
Not a reply definitely a question
Can I use this for a outdoor concrete area it is really a covered carport attached to 1 side of the house with the othet side having a small garden area then the side fence there is double gates at one end and open end leading straight into my backyard at the other.
Hi Kimberley, I would assume you could use it in a covered carport but to be sure, I would probably contact the company and ask. It’s always best to make sure before you go and buy the product.
Hi Kimberly,
Rust oleum does not recommend the rocksolid product on areas that are hit with a lot of uv rays. I believe the product tends to yellow with sun exposure. It may be ok since your carport is covered?
Is the floor slippery when wet? That is a big concern for winter time when ice melts off the car.
Thanks, and your result is just great looking!
Hi Cindy,
That’s a good question. Based on the product it’s supposed to be slip resistant. Based on my experience, when I’m wearing shoes with a rubber sole, it’s not slippery when wet at all. However, there’s been times where I wore heels or a shoe with a non-rubber sole (or that just has zero traction to begin with) and I’ve found it quite slippery. For the most part, during winter I’m wearing my winter boots so it’s not a huge issue for me. Hope that helps!
This is the first winter we have had it and found it a little slippery early in the winter season (the tires actually spun on the floor a couple of times), in spite of putting gritty sand in the finish.. However, since grim has coated the floor, it isn’t much of an issue. The one thing we found was the concrete no longer absorbs the melting water (which is a good thing) and the garage was ‘wet’ and very humid for awhile.
The floor looks wonderful. Now that you’ve had the floor get wet a few times, how slippery does it get? I’m going to do my garage, and I’m wondering if I need to also add an anti-slip grit.
thanks.
Hi Daniel,
During the winter months, I have found when I’m wearing shoes with a rubber sole, it’s not slippery at all. The chips help out a lot. However, there has been a few times where I wore heels or a shoe with a non-rubber sole and I’ve found it quite slippery when wet.
How did you handle the process of one 4×4 section then moving to the second 4×4 did you overlap paint strokes or meet the previous line.
I’m getting ready to put RockSolid down in my garage. How did you treat the control joints? Also, if you did it again, what would you do different? Would you add anti-slip into the clear coat application?