Pink Little Notebook
  • Home
  • About
  • Projects
  • Room Bf+Af
  • Contact
  • SHOP
DIY, Project Gallery 8

DIY: Spruce Up An Old Picture Frame

By Sabrina @pinklilnotebook · On March 6, 2014

Lately I’ve been on this organizing and decluttering kick. Little by little, I have been going through everything I have and purging everything I don’t need. And it feels great! I guess you can call it an early spring cleaning, if you will.

While reorganizing my office the other day, I came across some old frames I forgot about, wedding pictures that still need a home and tons of craft supplies that are sitting in a box.

Then a light blub went off in my head! And 10 minutes later, I created this simple DIY.

howtospruceupoldframe_PLN

Just because a frame is old, scratch or ding up doesn’t mean you can’t use it anymore.  In fact taking an old frame and giving it new life might just turn out to be one of your new favourite pieces.

What you will need:

  • an old picture frame
  • pattern card stock
  • Mod Podge
  • scissors/x-acto knife
  • rope

cardstock_PLN

frame_PLN

Remember the DIY budget friendly wall art I created for my bathroom?  Well I pulled out my secret tool again—DCWV Printed Cardstock (Decor Noir).  The book full of pretty paper!

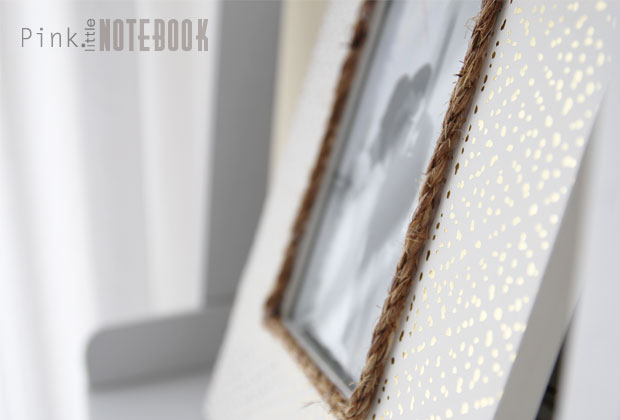
For this project, I chose a white card stock with a gold foil print.  I love this look!

Once you have all your supplies. Cut your card stock to the size of the picture frame.  I used an x-acto knife to cut out the center (however, I accidentally traced the shape from the back of the frame vs the front, hence, why I have such a large gap between the paper and the frame).

ropeaccent_PLN

Use the Mod Podge to adhere your card stock to the picture frame.

Once it is dry, glue your rope around the inner edge of your frame.  This will hide any imperfections that you may have.

Tip: Spray paint your rope to create different looks.  Use gold for a luxe look or bright pink for a fun look!

goldropeframe_PLN

This is such an easy project for anyone.  With endless choices of card stock, you really can create any look to match the interior of your room.

I can’t wait to complete the rest of my picture frames with this technique.

SabrinaBlog

DIYdiy picture framegold and rope framegold foil card stockphotographypink little notebookrope picture framespruce up a frame
Share Tweet

Sabrina

Sabrina is the design enthusiast behind the blog, Pink Little Notebook, where she explores her creativity through home décor, thrift store finds, DIY projects and her ever growing love to paint everything in sight! She is indeed a storyteller of style and has an extensive mixture of artistic skills and abilities which include everything from make-up art, graphic designing, painting, drawing, and even self-taught photography, just to name a few. Through her blog Sabrina combines everything she has learned over the years and hopes to inspire others along the way!

You Might Also Like

  • Before + After Makeovers

    Final Reveal: My Ice Cream Shop

  • DIY

    Finishing Details

  • DIY

    DIY Laminate Countertops

8 Comments

  • Grace says: March 6, 2014 at 10:25 am

    What a cute idea:)! I have a deep love for crafty card stock like that!

    Reply
  • Shauna says: March 6, 2014 at 10:48 am

    That paper is so pretty and I love how the jute just adds that little bit of texture. Beautiful wedding photo by the way!

    Reply
  • Inspire Me Heather says: March 7, 2014 at 6:59 am

    It looks so much better ‘dressed up” and it looks just beautiful holding your precious wedding photo!

    Reply
  • Cate Moore says: March 7, 2014 at 8:19 am

    adorable. I am in awe of the creativity online! 🙂

    Reply
  • Dani @ lifeovereasy says: March 8, 2014 at 12:11 pm

    Gorgeous! Love the contrast the rope gives. And bonus that it hides any cutting imperfections!

    Reply
  • Fun Photos says: March 19, 2014 at 11:34 pm

    What a great idea

    Reply
  • Patra says: April 24, 2014 at 12:21 pm

    Lovely!
    How did you handle the corners and edges?

    Reply
  • jackie says: January 17, 2015 at 10:32 am

    Can’t wait to try this! Great job.

    Reply
  • Leave a reply Cancel reply

    Hi I'm Sabrina
    Follow @pinklilnotebook
    Follow on Instagram
    Follow pinklilnotebook

    Subscribe by Email


    • Popular
    • Comments
    • Tags
    • Yes! You Really Can Paint Tiles: Rust-Oleum Tile Transformations Kit

      May 16, 2014
    • How to Freshen up your Grout Lines (for $2 or less)

      June 30, 2016
    • Thinking about the BLANCO SILGRANIT Sink?

      March 5, 2015
    • Part 3: Home Office Reveal

      May 10, 2013
    • REVEAL ORC Week 6: Combined Living + Dining Makeover

      May 7, 2015
    pink little notebook DIY The Mod House Project Para Paints One Room Challenge Para Blog Crew 2014 bathroom bathroom makeover washroom IKEA kitchen before and after Pink Litte Notebook bathroom reno house remodeling IKEA hack baby girl nursery Wayfair Canada tile

    Find us on Facebook

    Projects by Room

    Basement

    Bathroom

    Bedroom

    Entry

    Exterior

    Garage

    Home Office

    Kitchen

    Laundry Room

    Living + Dining Room

    Nursery

    Staircase

    • About
    • Before + Afters
    • SHOP
    • Press
    • Contact

    © 2019 PinkLittleNotebook.com. All rights reserved. PinkLittleNotebook.com participates in select affiliate advertising programs. This means that if you click and/or make a purchase through certain links on this site or any related social media platforms, PinkLittleNotebook.com may make a commission from that click and/or purchase. All opinions are my own, and all brands featured represent what I personally like and support.