
Hey all,
I have been working diligently to get my front entrance complete here at #TheModHouseProject. I’m infusing this small space with a serious dose of drama.
It’s bold, it’s beautiful, it’s unexpected. . .
anddd you’ll see exactly what I mean in two weeks when I share the big reveal :p

As you know, we recently installed this great hexagon tile floor. This graphic design element is definitely a showstopper as soon as you walk in the house. However, I couldn’t say the same about our closet doors. When we put them back up, it was pretty obvious they did not fit the modern style we were going for.


So what’s the most effective way to pretty up your dull stock white doors?
A DIY makeover! Just slap on some black paint + new brass hardware and you got instant sophistication. It’s that easy!

Here are a few pointers to help guide you in your own door makeover.
CLEAN:
Our new house is about 18 years old and I’m 99.9% sure these are the original closet doors. Before you paint anything make sure your surfaces are cleaned. Wipe all the smudged finger prints and dirt build up from years of daily handling. I just used disinfectant wipes and gloves (our doors were quite filthy). Also don’t forget to remove the old hardware off the doors!

PRIME:
I’ve learned the hard way that you CANNOT use latex paint over a surface that’s been previously painted with oil paint. It will peel and you will potentially cry after all the hard work you just did and now need to re-do. True story.
If for any reason, you are unsure whether the surface you are about to paint has been treated in the past with oil paint than just use this . . .

It’s an oil to latex conversion primer by PARA Paints. It still acts as a great primer especially when your dealing with interior doors but gives you that added protection. Trust me it will save you some unnecessary frustrations in the long run.

PAINT:
Once everything is cleaned and primed, you can start painting. I chose to paint the doors using Black Onxy in a Satin finish (P5246-83). It’s a charcoal black which is a softer alternative to a pure black. Not only does this colour add a cohesive look with my tile floors but the doors take on an air of swanky elegance!

Since these are closet doors that will be handled on a daily basis, I find a statin or semi-gloss finish is the best way to go. Both of these finishes have a sheen in them that will allow for easy cleaning in the future.
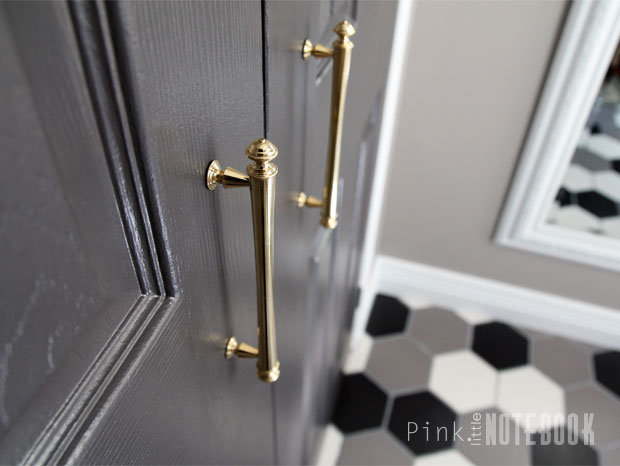
HARDWARE:
Now add some shine! I couldn’t resist a classical brass pull from one my fave online stores, House of Antique Hardware. Adding the right quality piece of hardware takes the transformation to a whole other level.
These heavy duty solid brass pulls have an overall length of 6 3/4″. I was looking for something longer than your average cabinet pull for a luxe look against the black. Also to avoid a front entrance that looks to bold, mixing in a classical vintage pull to my modern space just adds the perfect touch of elegance.

What a difference already! I love this door transformation and best part, it’s budget-friendly!
Just a few more finishing touches to this space and I’ll be ready to reveal the awesome before & after shots.
Stay tuned!

Disclosure: House of Antique Hardware graciously supplied me with the Large Classic Revival Pulls for this DIY project. All creativity, opinions and comments are entirely my own.


20 Comments
Love this – black makes such a difference. You’ve inspired me to finally get on the project of painting the inside of my front door :),
I was quite surprised at the bold statement it creates! It kind of makes me want to paint every single door black now LOL. Thanks for your kind words Steph 🙂
What a beautiful transformation with just some paint and hardware. I love when updating something is so easy! Great job!
Small project, big results!! Thanks for stopping by April!
So sophisticated and modern. Very nice transformation.
Sophisticated and modern. Great idea for a closet upgrade, I think the handles top it off. Nice!
Thanks so much! The pulls are definitely my fave part :p
Great job! I love your black. White and gray look. Our downstairs bathroom is about the same color gray. I really love the color! Painting the doors black really makes a difference!
It definitely does! I love the classic look of black, white & gray. . . can’t go wrong with that colour combo. I’m sure your bathroom is stunning!
I am so glad I came across this! We are about to start painting tomorrow and I learned some good tips!
Awee thanks Claire! I hope the painting went well and if I can help anyone avoid the oil/latex peeling issue, it makes me happy women ;P
Stunning! I envy your skills. This looks so high-end, but with just a few simple supplies.
Thanks so much! I was definitely pleased with the results in the end!
Love it! Love the new door and the hexagon tiles! I need to fix my front home’s entryway! I’d like to extend the tiled par by my home’s front door, but I don’t know who to cut and reinstall the carpeting to the tiled part! Would love to put in a hexagon floor!
Sounds like a great project! You can definitely install tile next to carpet, I believe you need a transition strip. I saw them at my local hardware store when I was searching for this project. I thought I would need one because my tile connects to my hardwood floors but they ended up being the same level and I was okay without one. Check it out, they have some great products out there!
Love the dark color with the greys!
Thanks so much Jena!!
Did you have to patch anything up when you removed your old knobs?
Hi Naz! No I didn’t patch anything. Although I did have to give it a good sanding to get rid of the glue that was underneath the knob for a flush finish.
Did you paint the hinges too or leave them white – the same colour as the frame?