
If your following me on Instagram, you would have noticed this past weekend that I’m finally tackling our basement laundry room.
You see, this is the part where I’m suppose to say nice things about the room but truth be told, I hate this room with a passion. And here’s why. . .

and here is the view from the opposite corner. . .
(sorry the room is so small it’s hard to get a proper shot)

Just an FYI, the basement was completed by the hands of the previous owner. I’m 99.9% sure he was not a contractor.
If I had it my way, I’d be tearing down these walls and moving all the pipe lines to rearrange the washer, dryer and sink to make the most of this small space. However, I just don’t have the budget nor the time so I’m stuck with what I got.
So this brings me to today’s post. How do we take a wall with multiple depths and make it look like a single straight wall without any major renos?
Well, we can create an illusion of straight lines using wooden shelving.

Now I know it doesn’t look like much because you can still see the outlets and where the wall dips but just imagine these shelves full of pretty boxes and laundry room supplies.
This little trick will have your eyes focus on the lines of the wood versus the uneven back wall. Also another great tip for making your walls recede is using a dark paint colour (I used: Power of the Game, PARA paints, P5207-51D) but more on this next week when I show you the final reveal!
How To Make Custom Fitting Shelves for an Uneven Wall:
For this project, you will need:
(I’m using the measurements from my wall as a guideline)
4 – 2×4’s cut to 85″
2 – 2×4’s cut to 62″
4 – brackets
sander
wood stain
cordless drill
nail gun
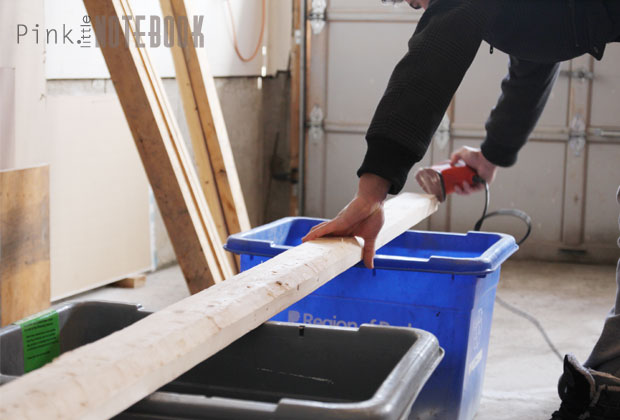
It’s a fairly simple process. I started with cutting all my 2×4’s to my desired length.
Since, I was working with a 12″depth, each shelve only needed three 2×4’s side-by-side. Now, I am creating two shelves, so that’s a total of six 2×4’s.
To get the correct lengths, I measured from one end of the wall to the other end – 85″
and then from the first dip in the wall to the other end – 62″

Once you have all your pieces cut, sand each 2×4 and finish it off with a quick stain.

Next comes the assembly. Lay two pieces of your 85″ and one piece of your 62″ side-by-side creating a 12″ shelf, making sure you leave the short end on the appropriate side.
Use your nail gun and secure everything together.
Once you have your shelves put together, purchase brackets or make your own. Determine the best placement on your wall.

Once the brackets are up, the shelving unit should slide right in. Secure in place.

And there you have it! Custom fitting shelves for your uneven wall!
Stay tuned for next week as I show you the reveal of our laundry room!

P.S. – If you like what I do, please help me out! Vote for Pink Little Notebook in The Homies Awards 2014. Also this is a great place to discover other amazing blogs as well. Worth a check!


7 Comments
Great start to your update! It’s going to be a great reveal. I wonder if the previous owners (or builder?) had planned for stackables….that would explain the mid-wall outlets to me since ours look just like that for the same reason. 🙂 Have a great week!
Hi Meredith! That’s a really good point! However, when we tried to pull the dryer out, we realized the vent hook ups were behind the dryer unit (the one on the left side) which means more holes in the wall to deal with. We can’t win either way 🙁
Thanks for stopping by!!
Ugh!! Ah well, no one’s going to notice a thing once you’ve worked your magic!
Nice job Sabrina! Can’t wait to see it once it all comes together.
We had mid wall outlets in my parents’ laundry room as well which was done by the builder. I’m not sure if it’s meant for stackable laundry appliances like Meredith said or what but it didn’t work with our plan to install the countertop so I called in an electrician to relocate them further down on the wall just below our counter height. It cost us a couple hundred dollars & I had to patch the hole left in the drywall but was well worth it for my mom to have her work surface!
Great job, Sabrina! I love the idea of using simple 2×4’s! The combo of the rustic shelves mixed with those pretty brackets is awesome. I can’t wait to see the final reveal of this room!
This a good job Sabrina. I really adore you for all the ideas that you’re sharing with us. The good thing that we can see full tutorials on how to create shelves that can save us big amount of hiring professionals on doing this.
Being a Being a novice at DIY projects….I was hoping you could let me in on the way you ‘nail-gunned’ your 2×4 shelving pieces together? Do you use angles? How many nails were used & approx. how far apart to you place them or where? any wood glue used at all?