
My main bath is finally complete!! I’m so happy about this one because not only was it done on a tight budget but we literally created magic with just paint and a few minor modifications to the vanity.


This project was quite the challenge. For the most part, I was able to come up with a creative way to use what we had. There was no room in the budget to lay new tile, replace the vanity or even buy new accessories (okay maybe I purchased a new rug!). I had to find a way to make this awkward pink bathroom blend in with the rest of our modern decor.

Here’s what we did.
For starters, the pink walls are no longer pink. The quickest way to transform any space is with a can of paint. I chose the colour white, ONE, because I had it on hand, TWO, white seamlessly blends in with our somewhat neutral tile and THREE, it’s the easiest way to brighten up a dull space.


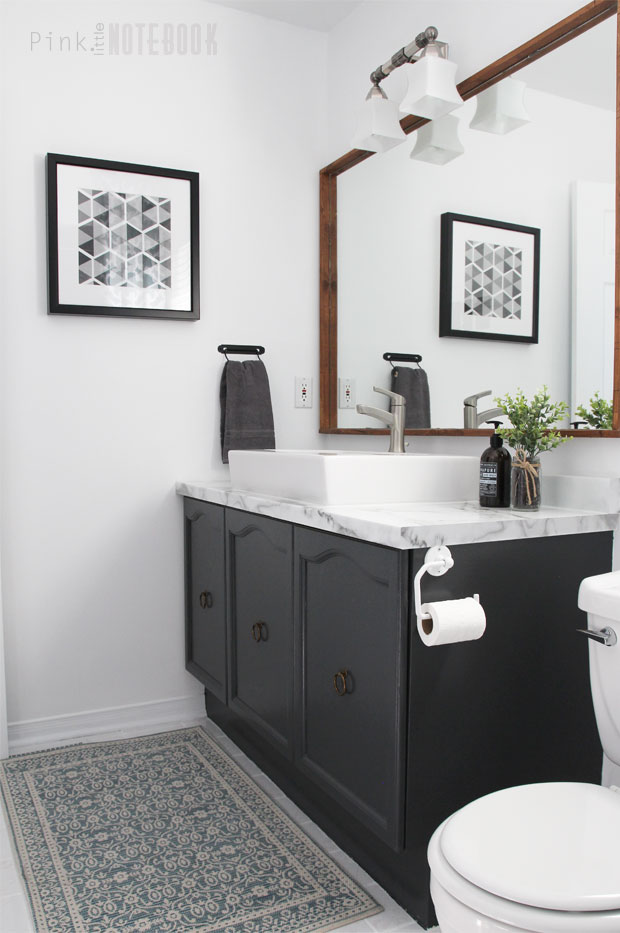
The vanity went through the biggest transformation in this bathroom. Not only did we paint the cabinets a dark shade, we repositioned the hardware to centre of the doors and replaced the dated countertop, sink and faucet. In case you’re wondering, it’s not marble, it’s a laminate countertop! You can check out all details about this vanity here.
If you noticed the big hole in the wall in the “before” image, this was home to the world’s most hideous built-in medicine cabinet. Since storage is not an issue in this space, hubs ripped it out and patched with drywall for a clean updated look.

To dress up the mirror, we framed it with stained pieces of 1″ x 2″ wood strapping (which can be found at your local hardware store). This is absolutely my favourite way to modernize an old mirror—simply cut the strapping to size and nail to the wall encasing the mirror. It’s easy to do, costs only $6 and looks freaking amazing.
The light fixture remains the same with the exception of the light shades. I replaced them with something a little less traditional.

The tile floor may look a little different and that’s because I took 10 years off them! By far, this is one of the most clever projects I’ve completed to date. I simply used white acrylic paint to cover all the beige grout…and NO it won’t wash off. It’s amazing how this little trick (that cost me less than $2 to do) made all the difference. I highly recommend it! Check out all the details here.


There were no changes made to the shower except replacing the shower head with something we had on hand already. That’s the great thing about doing so many renos, you tend to have a basement filled with leftover materials.
A lot of the items found in this bathroom are from my previous home such as this floor-to-ceiling shower curtain that I’ve created. I love the height and pop of colour it adds to the space.

Also another DIY project, the bath stool! Again using scrap pieces of wood from our stash, we created this little seat. Perfect for sitting when giving the little one a bath or to hold your big glass of wine and book 🙂


Cost Breakdown:
Paint/Stain: (already had) $0
Cabinet Pulls/Sink/Shower Head: (already had) $0
Countertop: Belanger Calacatta Laminate $109
Mirror Frame: $6
Faucet: $150
Light Shades: $10
Grout Refresh: $2
Rug: $25
Hooks: $20
Remaining Accessories: (already had) $0
Grand Total: $322
When it comes to bathroom revamps, it’s easy to spend double the amount you initially had in mind. If you’re on a tight budget, just remember to replace only the things that absolutely need it. Find alternative solutions to update the remaining items in the space whether that means repainting, repurposing or even building things like your very own vanity.
When there’s a will, there’s a way!


24 Comments
BEAUTIFUL job!! The bathroom looks refreshed. Your towel (single) loop looks interesting and modern,, did you make that too?
Thanks Tammara! Actually it’s a toilet roll holder from IKEA that I had. I think I paid $5 for it. It makes an excellent towel holder 🙂
http://www.ikea.com/ca/en/catalog/products/40264386/
Hi Sabrina, love ur bathroom make over. I’ve been thinking about painting the tile grout in my house (1200sq ft) and everything zI read says to NOT use acrylic paint…but, u say otherwise. Why the conflict.
Great idea! Thanks.
Wow it looks awesome! I LOVE the marble.
xoxo, Jenny
This is gorgeous and totally makes me want to redecorate our bathroom (even though we just moved in!) Floor to ceiling shower curtains always make me swoon.
WHAT?! I cannot BELIEVE you did this makeover for $300! Holy crap! You are so talented!!!
oh gosh those after photos just amazing!! It looks so good!! Love the colors you went with!
Holy moly! This looks amazing! I cannot believe the difference in the vanity, it seriously looks like you went out and bought a whole new one. Awesome job!
WHOA wow that is a major transformation and SO beautiful! I can’t believe it’s the same bathroom! Fantastic!
OMG gorgeous! I love the marble countertops and the rug. Such a beautiful makeover.
Girl I’m in the middle of my master bathroom I sure hope mine is as cute!!!
Stunning transformation! what an inspiring post, thanks for sharing!
You did all of that for $322?!?! I’m amazed! it looks SOOOO good. Great job!
Thanks for the share of your info about the paint of the grout with acrilic. Love you.
This is the most clever DIY bathroom revamp I’ve EVER seen!! The final product is GORGEOUS, girlfriend!!
Coming Up Roses
Looks amazing. Where did you get the rug?
Looks beautiful – great job. I do have an easier way to make the grout color look new if it’s already white. Just use white shoe polish (the kind with the foam applicator on top). The polish goes into the grout, but wipes easily off the tile. No tedious painting with a small brush is necessary!
You did an amazing job! Can you please provide what color paint you apply on your. Cabinet and also the brand as well. Thanks in advance!
I used Graphite (1603) from Benjamin Moore on the bathroom cabinet. I used this formula… http://amzn.to/2dtpNgi
LOVE the frame around the mirror! Could you give more detail on how you fastened it together and hung it? Or better, make a tutorial? :p
Thanks so much!
-Amie
Wow you did a fabulous job you did exactly what I’m fixin to do in my bathroom, I have it all prepped to paint but I think I am going to put up beede board instead even on the ceiling, the panels are 4×8 and cost 8.00 per panel and I can do it with three panels. It is a small bathroom and I think that will make it look bigger. I just hope I do as good as you.
Hi there, wondering if you did anything to the white cabinets before painting? I have super cheap white builder grade cabinets and most of the diy are showing wood so they sand them down and prime before painting. I don’t think you do that with the white cabinets though. Thanks!