
When I begin designing a room, chances are I already have a vision in mind of what I want the space to look like. The only issue I have about 90% of the time is I can’t find furniture pieces in big box stores that fit my unique vision.
In my dream world, I would have unlimited funds and access to top-notch furniture makers with the ability to get everything custom made for that seamless fit. However, reality does check in and I have to face the fact that my plans need to be altered to make due with what is accessible to me.
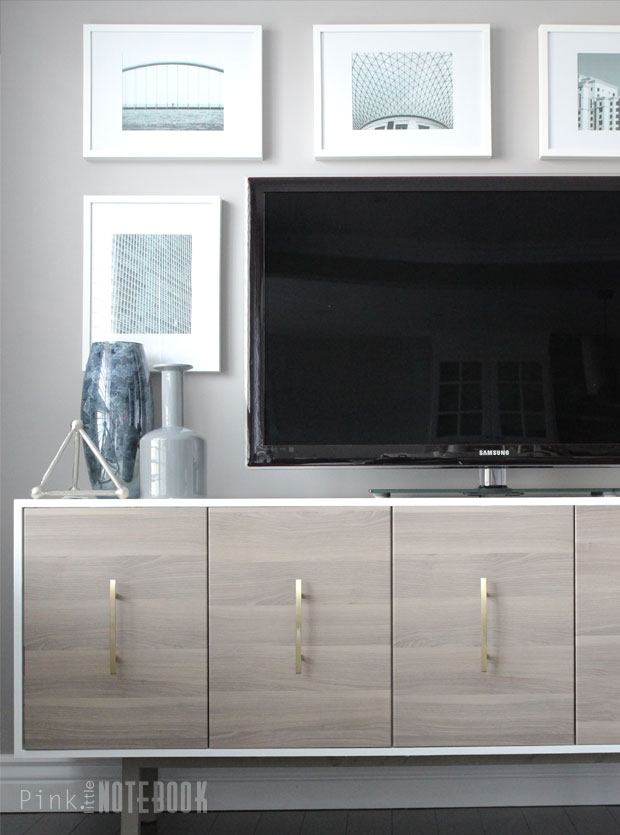
That’s why I love coming up with clever ways to get a customized look for less. In my latest family room makeover, I created a TV stand using IKEA kitchen cabinets and some fancy brass hardware for that clean linear look that I was after.

This great versatile project could easily be used as a sideboard, a buffet server or just plain out extra storage in any part of your home. We made this for roughly $400, which is a steal of deal compared to similar style units that I was looking at for over $1,300!
Side Note: If you are on a tight budget there is a way to cut the price in half even further using IKEA BESTA TV bench. We didn’t end up going this route due to the fact that the benches only come in two lengths (47″ or 70″), one being too small and the other being to large for the wall we are using.

To begin, we started off with two SEKTION wall cabinets (30x15x20″), which are typically used in a kitchen above a fridge or freezer. We assembled and secured them both together.

In order to create that white frame around the unit, we used inexpensive fibreboard shelves, which we found at our local hardware store.

Although the primary function of this fibreboard is for shelves, the dimensions actually work perfectly in order to wrap the IKEA wall cabinets. With a cabinet depth of 15″ and the shelf depth of 16″, the only cuts we had to make were for the length. The inch difference gave us enough play to add an overhang to the front of the unit so the cabinet doors are flush with the wrapped frame.

To secure everything, we used PL adhesive and some finishing nails.


Now the great thing about IKEA wall cabinets is if you want them to float on the wall you could just purchase the suspension rails to do so. However, I wanted this console to look like a piece of furniture so I opted for legs. We created our own out of 1×2″ pine wood in the following measurements:

If I had to do this project again, I would definitely alter a couple of measurements for the base. When we placed the unit in its upright position, I noticed we couldn’t see the front of the base. Although we didn’t go back to change it, I would have love to see the 3.25″ measurements bumped out to 1″ to make the base more viewable.

We played around with different hardware options. Originally I wanted a round pull but the ones I purchased were too small and not the right colour.

After making my husband stand there for 15 minutes holding hardware, I finally decided to use the stain brass handles, which we found from Home Depot in a vertical position. The proportion of these massive 7″ pulls were definitely a better fit.

The great thing about this project is that IKEA has a variety of different finishes when it comes to cabinet doors. You could really alter the look significantly to match any decor in your home!
Product Breakdown:
Wall cabinet (x2): $88
Cabinet Doors (x4): $208
Door Hinges 2 pk (x4): $36
Door Dampers 2 pk (x2): $10
Fibreboard Shelf (x2): $22
Gold Hardware (x4): $30
White Paint (leftover): $0
Grand Total: $394


23 Comments
I really love this. Im kind of pissed I already own a perfectly good TV stand
I love Ikea hacks! This is an amazing and inventive way to create what you want for less. I also love the pulls that you decided on.
This looks like it cost more than $400! I would love to try making this for my own home.
Amanda
Trulyyoursa.com
I love how this turned out! Very creative.
This is GREAT! I LOVE Ikea hacks so much!!! <3
Oh Sabrina, the cabinet is gorgeous. Actually your whole wall, gallery, fireplace and paint choice couldn’t be more perfect. Everything just flows together and it’s all so easy on the eye. My hat’s off to you and i have to say you look so young to be this talented already. Please don’t take affense to that, it’s actually the best complement i could give you. ( : I will be subscribing and pinning ( :
I echo the reactions of all of the above and I am supremely impressed by your innovation and vision. Every detail is well thought out and executed fussiness is QUEEN! Thanks so very very much for your generosity in sharing I look forward to seeing glimpses of how your brain works — for those of us who aren’t so gifted!!! Thanks DN
I love you so much for this! Thank you thank you! I am definitely going to try this in a month or two. Do you have an opinion on whether this could handle a different type of leg? I was thinking maybe hairpin if it isn’t too tricky. Or maybe i could simply order some legs that lean more toward mid century style. Any thoughts?
Hi Elizabeth,
Yes, you can definitely use any type of legs for this project. My only suggestion would be to consider the overall height you want to achieve in the end. Since we used this as a tv console, we wanted it to be eye level so the height of legs were made accordingly.
Thanks for posting this hack – we are going tondo something similar to create a floating media cabinet. Did toughest use rollers to paint the fibreboard shelves?
Hi Sunik, we used a mini roller to paint the fibreboard. Two coats, it was quick and easy!
SUPER clever hack! Well done!
What a beautiful console. Well Done!!! Quick question…I love the color of the walls in that room. I’m looking for the perfect gray and you found it. Would you mind sharing wall and trim color? Thanks!
Hi Theresa, Thanks so much! The wall colour is F-Stop (P5243-44) by PARA Paints (eggshell finish) and the trim colour is Whitewash White (P2089-00), PARA Paints (satin finish)
Hi Again, Sabrina
When I looked at this again (I’m going to use this look in my kitchen, thanks to you!) I realized I don’t know the name of the cabinet fronts you chose? They’re perfect, please tell me the name and where you got them from if not Ikea!
You rock, girl! DN
Hi there! They are IKEA cabinets (BROKHULT walnut effect light grey). Good luck with your kitchen! Let me know how it goes 🙂
Hi Sabrina! We’re going to do this in our family room with Sektion cabinets – thanks for the inspiration! We have three to bolt together – how did you secure the two cabinets together before putting on the MDF?
Hi Heidi, We screwed them together from the inside of the cabinets. Please do share an image of your project, I would love to see what you did!
Love IKEA hacks and this is so stylish.
Thanks so much!
I like this but wanted something taller that can be used as a side table/buffet/bar. Do you think the base you created could hold up? How much weight could it withstand?
Hi Camille, I’m not sure how much weight this would hold. It seems pretty sturdy. However, in your case, I would just go for a thicker and better quality of wood and you should be good.
Beautiful. How did you finish the ends that you cut off on the fiber board shelf that you wrapped around the cabinets?