
Welcome back all!
I hope you all had a restful and enjoyable holiday season! For the first time ever, I can finally say the hubbster and I actually had some time off together. It was a much needed staycation—one which could have lasted longer—but really necessary after a hectic 2014.
During our break, we thought we use our time wisely to finish up some minor things around the house that we’ve yet to do from phase 1 of #TheModHouseProject . . . you know, things you leave to the bitter end because they are simple & easy tasks.
Or at least you think!
Anyone who’s ever attempted DIY projects around their home knows errors are part of the process. Sometime things go according to plan and other times you just want to kick the walls in because you made a stupid mistake. However, it’s how we learn from our mishaps that make us knowledgeable for our next round of DIYs.
So today, I thought I’d give you an insight to our little mishaps that occurred during our holiday break. Hopefully these few pointers might be helpful for any future project you may attempt in your home.
1. Hanging Pendant Lights – Make sure your fixture’s cap is big enough to cover the hole in your ceiling

As you can see from the above image, our kitchen remains unfinished. We are still missing a drawer front + knobs for the upper cabinets, no backsplash is installed yet and we’re still working on creating the look of ceiling height cabinets with custom risers and mouldings (hence why you see a gap from the ceiling).
We did, however, installed our pendant lights over our kitchen island! We “ohh and ahh” at the first pendant light that went up. Then we installed the second one only to realize the drywall hole in the ceiling is slightly bigger than the electrical box which the pendant light cap did not cover. Unfortunately, this called for some patch work.
(I wish I had a picture to show you but at that exact moment we were too busy cursing up a storm)
A 10 minute job ended up extending to a 2 day patching job. What made it even worse? There was no support for the drywall compound to adhere to which made everything that more problematic.
We are still unhappy with the results. . .

Although we tried our best to level it off with the drywall—once it dried—it still looked like a hack job to me. Maybe this could have been avoided if we chose a light pendent with a bigger cover. However, lesson learned—make sure you check the ceiling holes before you buy your light fixture.
Just another item that remains on the ‘to-do’ list.
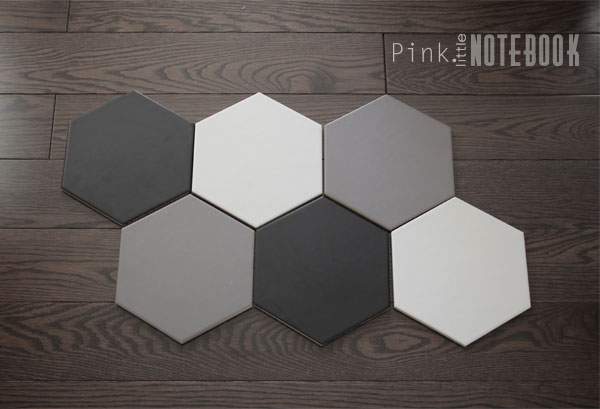
2. If you’re working with hexagon tiles add 20-25% extra tile to your square footage

I found this gorgeous hexagon tile for my front entrance. I was excited about my bold choice and even more excited that we don’t have to look at plywood subfloors anymore when we walk into our home. Before we were about to install, I decided to dry fit all my 7×7″ tile to make sure I knew exactly what pattern I wanted to work with.

As it turns out, I was short a few tiles (even with the 15% extra tile I purchased on top of the sq.ft. I needed). I didn’t account for the unusable angles once we cut into the hexagon tile. Also because I wanted to do a sporadic colour combination, I didn’t account for the tile that would be wasted due to my sequence of colour.
So the weekend that we had planned to tile and grout was a complete write-off. Everything was pushed to the following weekend until my new order of tile came in.
Pssst. . . hexagon tiles are a lot harder to install than regular square or rectangle tiles. I would not recommend this for a newbie.
3. Putting back your interior doors after newly laid hardwood

We’ve had hardwood floors installed for sometime now but haven’t put any of our doors back on its hinges. They all need a fresh coat of paint so I figured since all the doors are being stored in the basement, I would paint them there (which I haven’t done yet).
During the holidays, while I was doing a million and one loads of laundry, I cringed at the fact that my little old washing machine sounds like a dying 30 year old motor boat. Since I have no door to close off the sound, it echoes through my entire main floor. Out of sheer frustration, I wanted the doors back in.

So we brought all the doors upstairs from our basement. We put them back on only to discover we can’t open or close our doors fully. Since we changed our floors to hardwood which is thicker than our previous floor, all the bottom of the doors are rubbing up against our new floor.
Guess what that means?! We need to add another item to our ‘to-do’ list—trimmed all the bottoms of our interior doors.
So there you have it!
These are some of the problems that occurred during the past couple of weeks. Sometimes a simple task can turn out to be the most daunting and probably the most time consuming task. As I constantly remind myself “one step at a time, it will all get done!”
What DIY problems have you come across in your homes?


13 Comments
We actually have lights like you do in your kitchen and the bulbs keep burning out! I’ve been trying to look for new ones with better bulbs but I am having the issue you mentioned…none will cover the current hole that is there! What a pain! Good luck on finishing your projects 🙂
Hi Christine! Oh no do you know why they keep burning out?! Nothing is worst than finding a light fixture you really like and then it not covering the hole in the ceiling. I wish you luck on your search! Thanks for the comment:)
Have you considered trying a “ceiling medallion” to cover the excess space around the pendant cap?? They come in a wide variety of styles and price points.
Do you think that professional contractors don’t make “goof-ups” similar to yours? While they are being paid to be perfect, they do make goof-ups too. Don’t always let the customer know it. Sometimes they hope you won’t realize it and make them do it over.. I wouldn’t stress out over what seems to be minor things..so it takes you longer to finish the project. Do you think “Rome was built in a day?” Sabrina, you and hubby are amazing and while you’re upset with these small goofs..think how much money you are saving by doing it all yourself. That’s a $$$$plus sign in my eyes! Look forward to seeing the finished project.
Hi Betty! Thanks so much for your kind words! I have heard a few horror stories in the past regarding contractors. So you are definitely right! A professional or not, people are prone to making errors. At this point, I’m very grateful that our errors are very minor and most importantly, fixable. We are saving huge bucks doing everything ourselves. . . one of the many reasons we are able to keep on going: )
You reno is coming along beautifully! We added on to our house in 2011 and remodeled a bunch of existing rooms along the way. We certainly had our fair share of mishaps too!
That sounds like a huge project Christin! Good for you!! It’s nearly impossible to predict what is going to happen during a renovation. . .I guess mishaps is just part of the whole experience. Thanks for stopping by!!
Good tips! Your renovation is looking good!
Thanks so much Lauren!
These are awesome tips, thanks for sharing! And I LOVE the look of your hexagon floors!
xo Caitlin
We can’t wait to share the reveal of the hexagon floors. It definitely turned out 100% better than we imagined! Thanks for stopping by Caitlin 🙂
I’m obsessed with those hexagon tiles! Can’t wait to see how it turns out.